Vintage silver has a way of making a home feel collected and lived in. Whether it’s a family heirloom, a thrifted find, or a favorite piece that’s been tucked away for years, this simple cleaning method makes it easy to remove tarnish and bring back the shine without harsh chemicals.

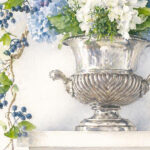
Several years ago, I inherited a pair of vintage silver urns from my in-laws. When I brought them home, they were heavily tarnished and honestly looked beyond saving. I briefly considered leaving them that way because tarnished silver has become popular again, but I knew I wanted them clean and shiny. The problem was finding a method that worked well without harsh chemical cleaners. After a little trial and error, this simple process brought them back to life, and it’s the only method I’ve used ever since.
This post may contain affiliate links. See my disclosure statement.
What You Need To Clean Silver

- Baking soda
- Salt
- Soft towel or cloth
- Aluminum foil
- White toothpaste for stubborn spots (optional)
How to Clean Silver

- Line your kitchen sink or a large basin with aluminum foil, shiny side up. Fill with very hot water.
- Add 1/2 cup baking soda and 1/2 cup kosher salt. Stir until dissolved.
- Place the silver pieces into the water, making sure they touch the foil.
- Let the silver soak for 3 to 5 minutes.
- Remove the silver carefully and rinse well with clean water.
- Dry and buff with a soft cloth or towel.
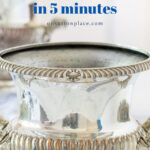
The image above shows one of the urns halfway through the process. I was amazed at how quickly the tarnish disappeared.
Tips for Cleaning Tarnished Silver

- Use more baking soda and salt for large pieces
Larger items may need more water and a slightly longer soaking time. Increasing the baking soda and salt helps speed up the cleaning process. - Wrap silver loosely in foil if needed
For heavily tarnished pieces, loosely wrapping them in aluminum foil can help the cleaning mixture work more effectively. - Use white toothpaste on stubborn spots
A small amount of plain white toothpaste on a soft cloth can help remove streaks or dark spots that remain after soaking. - Repeat the process for badly tarnished silver
Older pieces sometimes need a second soak to remove years of buildup. - Adjust the amounts based on the size of your sink
If you’re using a large sink or basin, increase the baking soda and salt to about 1 cup each for best results. - Is baking soda safe for silver?
For most everyday vintage silver pieces, baking soda is a safe and effective cleaner when used gently. If you have a rare or highly valuable antique, professional cleaning may be the safest option.
Why I Prefer This Silver Cleaning Method

This method is meant to clean tarnished silver naturally, not create a heavily polished finish. I actually prefer that softer look because vintage silver keeps its character and doesn’t look overly shiny or harsh. Traditional silver polishes often contain strong chemicals, and in my experience, frequent polishing can make silver tarnish again more quickly. This simple process keeps silver clean, bright, and ready to use without a lot of extra work.

One of the best things about learning this simple method is that my silver no longer stays tucked away in a cabinet. Pieces that once felt difficult to maintain are now easy to clean and use throughout my home. I love filling the urns with flowers, setting them on a mantel or table, and mixing them in with other meaningful collections and vintage finds. Silver doesn’t have to be perfect to be beautiful, and keeping it clean enough to enjoy makes all the difference.

A YEAR OF SIMPLE LIVING AT HOME
A gentle guide to slowing down
and enjoying the seasons at home.


amazon storefront
Discover simple and affordable
ways to refresh your home.
Does this method work for silver jewelry as well?
Your inherited urns are beautiful. Your article is so timely. We’re on the same page because I recently went into a plastic tub in the cellar and pulled out a few old pieces of silver I had tucked away. Probably picked up at flea markets years ago. I’ve been putting off cleaning them up and your way sounds good. I’m going to give it a try. Happy fourth. Keep cool.
Do you cover the whole sink with foil – the sides as well as the bottom
Yes. It takes 2 really long pieces of foil, but that works the best. Good luck!
Thank you so much for this information on cleaning silver without chemicals. I appreciate it!
Great info. We recently went into an antique shop that was mostly silver–utensils, dishes, etc. I would love to have the time that someone spent cleaning all of it. It was like a history lesson!
Do you have a brass cleaner? Also where you got your living room rug
Thx!
I am mad at myself for not taking a before and after. It really works.
Hi Ann, one way to keep your silver shiny once you have polished it, is to make a ball with aluminium foil paper (the size of a ping pong ball) and place it in your cabinet. I have a display cabinet with many pieces of plated silver, and I keep them nice and shiny with this trick. Not sure where I got the idea, but it does work. I do the same in my silverware drawers, and I am good for over a year.
Happy Thanksgiving from a Canadian friend burried in snow!
All the time I could have saved as a child polishing silver for special occassions! :)
Great tips for cleaning silver.
I have a few pieces of silver but I love the tarnished look but I kept this recipe and instructions in case I ever need to shine mine up.
Oh my wish I had known this when I was a teenager and earned my pocket money.
This is amazing! I will have to dig out my silver!
Love the simplicity of this method! Thanks for sharing.
I tried it on my silver plated trays and it worked. They may not be as shiny and pretty as yours but I was pleased!
I also use the foil and hot water, but use sodium percarbonate, which is a bleach alternative that I use with my whites when doing laundry. It’s saved many pieces of jewelry. I also use a glass bowl. Works like a charm!
I have a question. Does it matter if the dull side or shiny side of the foil is facing the silver pieces being cleaned? It seems at some point in time I heard you use the shiny side but I am not sure. Anyway, this is an awesome idea and if one side does not work I will try the other side. Blessings!
Thank you, Ann. My silver, like yours, has been packed away for quite some time because I hated sitting down and doing it. I am absolutely going to try this! I love silver all shiny but that cleaning yuk. Thanks again. I enjoy your blogs so much.
Great info on cleaning silver. I use “Hagerty 70000 2-by-7-Inch Silver Protection Strips” in my silver chest. I “never” have to clean my silverware. I put a strip in my bowls, ice bucket. I put my trays in the Silver Storage Bags and add a couple of strips. You do have to change them I think every 6 months.
I truly enjoy Suttonplace. We also have downsized, it took some adjusting but, we are really enjoying our new home.
Worked for sterling silver earrings. I used a teacup with a small piece of foil in the bottom and one tsp each of baking soda and regular white table salt. Added about 1/2 cup of very hot water. Put in two pair of earrings for about 15 minutes and it worked great! Thanks for this simple and healthy way to clean silver.
I am following your favorite quote and resting now but tomorrow I plane to clean silver using this method. Anxious to try it.
Wow! Thanks Ann
I have an old silver piece for serving shrimp and I love the idea of not cleaning it with chemicals.
Oh, how I wanted to save this to Pinterest but I can’t save anything of yours. Please help me.
This is a great tip.Your urns look brand new and beautiful.
I have been cleaning my silver the same way for years. It has not damaged it at all. Put it in the sink go to lunch and oh La la shiny silver. So fun to use it on a regular basis!
What a wonderful cleaning hack! I am crazy about silver and use it whenever possible. This post will be saved for future reference. Thanks Ann!
Nice post.
Dear Ann,
This is brilliant! I can’t wait to clean my grandmother’s silverware!
Thank you, Thank you!
Been waiting to try this! Thanks for sharing.
BTW, if you have copper bottom pots, you can add vinegar to your dish washer’s rinse compartment. You will be amazed how it goes from dull to copper again.
Does using a toothbrush scratch the silver? I have 4 (I know, can you believe it?!) antique silver coffee and tea services inherited from my mother and mother in law and keeping them cleaned and polished is such a process! I love them and love who and what they represent. I don’t love cleaning them. I’m going to try the salt and baking soda process but am unsure about the toothbrush. Toothpaste is fine if I can just rub it in with my fingers. Any thoughts on if toothbrushes scratch the silver?
A soft toothbrush should be fine. A cloth would work just as well if you are worried about scratches…and your fingers with some pressure would be a good idea too. Good luck!
absolutely beautiful used a planters and awesome as shiny and cleaned too! thanx for the inspiration!
Is this method successful on both sterling silver and silver plate?
I’ve never used it on silver plate so I can’t honestly answer your question. My advice would be to mix some soda & salt with some hot water in a bowl. Dab it on the underside of your silver plate piece and see what happens. Good luck!
Oh my goodness, your silver pieces are just beautiful! I’ve tried this method with no luck in the past, but I’m going to give it another go! And I have a pair of silver earrings that are badly in need of cleaning, so I think I’ll try the baking soda paste on those. Thanks for the inspiration, Ann!
Thank you! I recently tried toothpaste but It didn’t do the trick. I will try this method.
Toothpaste method should work, but aluminium should work better because it’s a temperature method and it can get rid of the tarnish faster and mor efficient.
I used the toothbrush method and it worked, but it also depends on the level of the tarnish. If it developed over the years, yeah, that method may be a little too soft.
Thanks for this natural and much easier approach to cleaning silver. I use my silver urns to hold my paper towels. Love it and enjoy seeing them every day next to my sinks.
Does this work for silver jewelry?
Hi Michele…yes it does. However, if it’s valuable jewelry, I’m not sure I would try it. I’ve cleaned my silver jewelry with a soft tooth brush and a baking soda paste. That works very well too.
Doesn’t matter what kind of salt you use – it dissolves in the hot water. I’ve used this technique for smaller pieces, and just put them in a disposable foil pan, which can be reused for future cleanings. I add white vinegar after putting the silver in the hot water, baking soda, and salt mixture. The vinegar and baking soda bubble up – and the tarnish disappears. Love it!
This is brilliant! Thanks for the great tip!
Annie XO
Thank you for sharing these helpful tips(: I’ll use them to clean my sister’s trophies. Just one question, could I use sea salt?
I’m not sure about using sea salt. The kosher salt is very course and may remove the tarnish better. You could try but it may not work as well!
Perhaps I should clean my silver, I love it tarnished, but it looks so lovely when it’s shiny and new looking.
Have a good day!
Do you have any information on how to clean brass with natural ingredients? Strong chemicals make me sick and I have not been able to find anything that works. HELP, PLEASE!
I think the best way to go about cleaning your brass is to use baking soda and vinegar. Pour a little vinegar into a bowl and add baking soda until it makes a paste. Rub it on your brass until the tarnish is removed. Rinse and buff it to get the shine back. One other idea is to use ketchup. I know that sounds odd but it is acidic which is what you need to remove the tarnish. Squirt some ketchup on a dry rag clean and rub on your brass. Rinse and buff. I hope one of these ideas works!
THE best and natural way will blow your mind how simple ——- ketchup!!! Put on and leave on several minutes depending how tarnished, and then rinse w water!
This is such helpful info! I have a ton of silver to clean. Thanks!
Wow, Ann. I will gladly toss the hideously smelly, full of chemical cleaner in my cupboard. This is brilliant.
Thanks.
Fondly,
Glenda
Ann,
This sounds so good I am going to have to give this a try. I have my mothers silver and I love using but like everyone I know I can’t stand polishing it when needed. I’ll see how this works.
Cynthia
I will have to try this again, I did try the baking soda/foil with NO luck~but perhaps my silver was too tarnished! I actually chalk painted some candlesticks I couldn’t clean and they look great now! Your urns look lovely, just like new!
Great information, Ann. Thank-you!!!
I have been reading about the tin foil method and want to try this. I have 3 handmirrors that need cleaning,but I am hesitant to put them in the liquid because I am afraid it might hurt the mirror glass. I guess the ony way to see if it will is to try it. Thank you Ann for the information. Have a great weekend.
Thanks for the tips, Ann! Your urns are beautiful!!! Have a nice weekend!~~Angela
Thanks so much, Ann. The urn turned out fantastic! I recently used the foil/baking soda and it didn’t really clean up the tarnish on my silverware but actually added a nice shine. I’m going to try this. I’m a little worried about doing it in my sink though, I used a large pan…I didn’t need a lot of depth. My sink is porcelain, can the tarnish harm it?
XO,
Jane
I’m honestly not sure about harming your sink. My sink is acrylic and it didn’t do a thing to it. I almost wish it had so then I could justify getting a new sink. Ha! The water after cleaning was dirty and the foil becomes sort of discolored. If you are really worried then a large pan would be the way to go. Thanks for your comment!
Thank you so much for sharing, Ann! I’m going to give this a try next week… my silverware is desperately in need of a cleaning!
Great tips Ann! Your silver urns are just beautiful!