
Garden edging stones add structure and charm to any flower bed, but over time they can sink, shift, and create a messy border. This simple, step-by-step guide shows exactly how I maintain my stone landscape edging each spring to keep our garden beds looking neat, defined, and easy to mow around.
This post may contain affiliate links. See my disclosure statement.
Quick Summary: How to Maintain Garden Edging Stones
- Remove the edging stones and set them aside.
- Fill in sunken areas with soil and leftover mulch.
- Level and smooth the border base.
- Reset the stones tightly together.
- Cut a clean grass edge for a neat, defined finish.
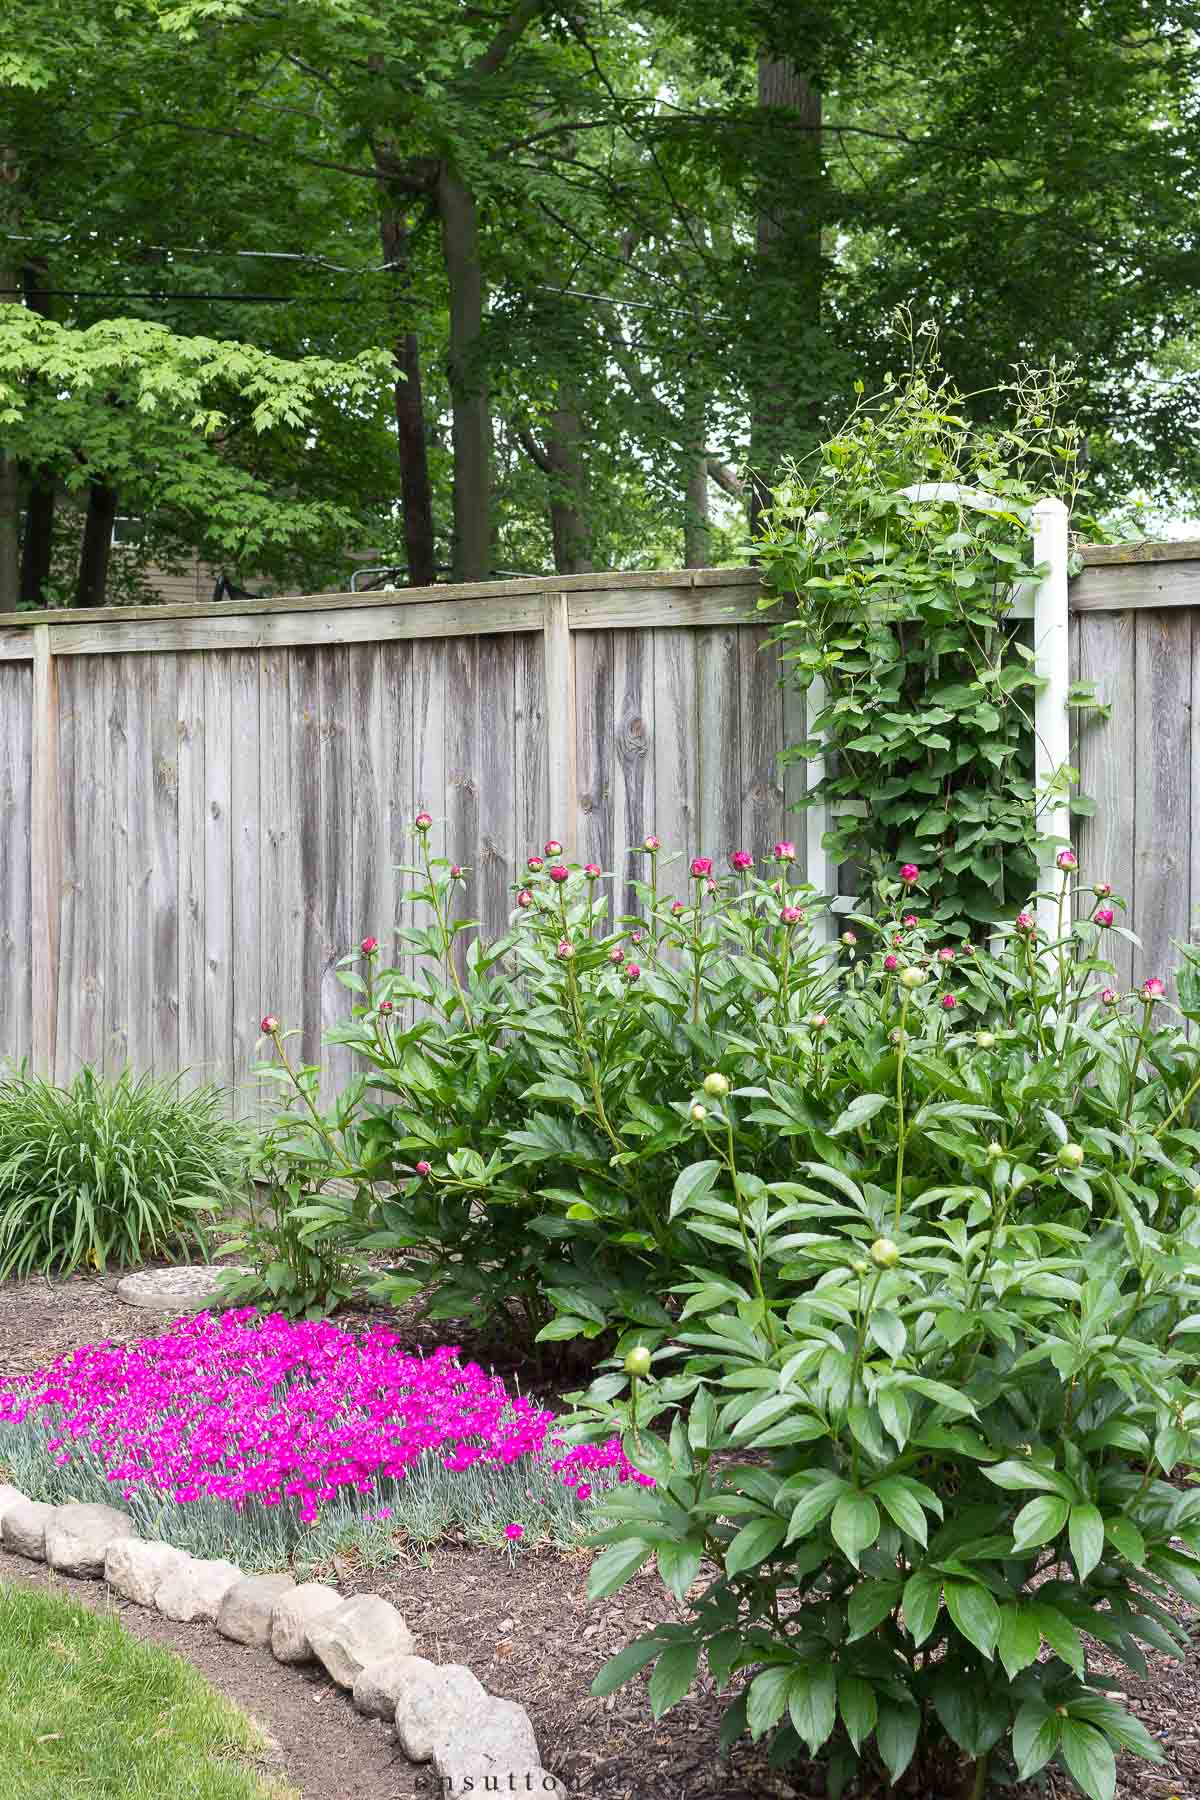
This post features the backyard fence-row garden at our house on Sutton Place. The summer before we moved, it was filled with peonies, dianthus, black-eyed Susans, lavender, and more. The garden was framed by a curving stone border I installed years earlier using stones I got for free from a friend. The edging added charm and definition, but it wasn’t maintenance-free. Every spring, after the ground had warmed, I spent an afternoon resetting the stones. Over time I figured out exactly what worked to keep the border looking neat and defined.

The picture above shows what the edging stones looked like each spring. During the winter months, the stones would sink, and mulch would overflow onto the lawn. The border became blurry, and it looked unkept and messy.

Where To Start
Start by removing the edging stones and placing them about a foot inside the garden bed. This creates enough space to reshape and level the border. I tried several tools over the years, but using my hands, along with a small garden cultivator, worked best. Pull the loose mulch and soil toward the grass edge to fill in the holes left by the sunken stones, smoothing and leveling the base before putting the stones back in place.

Resetting The Stones
Once the soil is level, reset the edging stones in their original placement. Press each stone firmly into the smoothed base so it sits level with the surrounding ground. Keeping the stones close together prevents gaps and creates a strong barrier that holds mulch in place and keeps the garden bed looking defined.

Easy Stone Landscape Edging
One of the reasons I love easy stone landscape edging is the clean definition it creates between the lawn and the garden bed. After resetting the stones, cut a sharp grass edge about 4 to 6 inches away using a straight shovel. This small step dramatically improves the finished look and gives the lawn mower a clear path to follow for a crisp, professional edge. Natural stone edging may not be perfectly uniform, but that variation adds texture and charm while still maintaining structure.

When Stone Landscape Edging Works Best
Stone landscape edging works especially well along fence rows, curved flower beds, and shrub borders where a natural look is preferred. It’s ideal for gardeners who don’t mind a little seasonal maintenance in exchange for texture and charm.

Frequently Asked Questions

Lawn edging made with stones is not for everyone. It’s not maintenance-free, and it takes a bit of effort and labor to keep it looking nice. The end result is definitely worth an afternoon spent outside!

THE EVERYDAY GARDENER
The Everyday Gardener is packed with simple, practical tips
to help any homeowner create a beautiful, low-maintenance
outdoor space with confidence.


Have one bed edged with stones. The trench btw the grass and stones is like a little water trough. Keeps getting deeper and dealing with weeds. Will try this idea of resetting and leveling. It’s not a flat area so I wonder if that matters to.
Thanks for the advice!
Hi Jen…I never had any trouble with weeds between the grass and the stones. If it’s more of a ditch, filling it in would be very helpful. You can also try a product like Preen, that prevents weeds. Good luck!
All of my borders are edged with rocks from our 40 acres and we built raised beds with very large rocks on our sloped back yard overlooked by screened in
porch. Lots of work but worth it. Between raised beds are small pebble paths. I also have two fenced in cutting/vegetable gardens. I have a half acre of shade garden too. All lots of work but lots of joy. Mulching helps. I use pine needles gathered from a variety of spots. I think my gardens would fall in cottage garden category.
I did a project similar to this recently. I look landscaping weed bsrrier cloth ans use landscspe pins to hold it in place laid out the rocks on it and poured a little clean play sand around and between the rocks and then out lined the front edges of the rocks with pea gravel. I am hoping the landscape weed barrier fabric will prevent the rocks from sinking while at the same time prevent grass from growing between the rocks. I like the look but its summer now; will have to see how it winters over ( we live in Maine)!
The rocks and mulch look good, but I’m not actually a fan of having 6″ of exposed dirt. Visually or how it will collect weeds.
I never had a problem with weeds…and I had to have a path for the mower wheels. But I get it!
Re sinking garden stones – we removed the stones, dug a trench under them but unlike filling it with small stones we filled it with quickcrete. Once it rained it set up and tada we had a solid bottom to put the stones on and they no longer sink. It took a while but was a one and done fix.
Love the look of the rock border-where do you find the rocks?
You can get rocks at any landscaping place, or nursery. Mine were given to me by a friend who dismantled a grotto-like structure in her backyard. If you have to buy them, they are a bit pricey, but you could do a section at a time.
Oh my gosh! Why has it ever occurred to me to reset my rock birder. It looks so much better. I know what I’ll be doing this weekend!
I have rock borders and I do the annual resetting of the stones.
If you live in a warm climate with black widow spiders, be very careful. The first time I uncovered a black widow, I think I jumped back 5 feet! Now, I wear gloves and move the rocks with a hand tool. Spider spray is always nearby to treat any webs and nests. If I do the border cleanup in the spring, I also check the stones during the hot months, looking for the webs and small spiders.
I Love rocks!! What you have showed me, it gives me some ideas for my flower beds. Thanks for the tips!!
Rock borders are the best! When we bought our first house there were no borders separating the lawn from the beds in the 17 year old landscape so the grass had grown into the beds. So I gather some nice rocks from the hillsides of my favorite fishing rivers and it looks awesome!
I mulch part of my flowers with solid rocks found on our farm in Southern Indiana. I LOVE rocks!!! I am about to go out now because it is going to be only 79 degrees today. Can you believe it? Yesterday I worked six hours because I have been sick and the weeds took over. Maybe my battle can be won today!!! Here’s to fellow rock lovers–use them when you can!!!
Oh my gosh Ann, your flag painted on the garden shed… We have a flag painted on ours as well! Daughter Natalie and her Daddy spent one Father’s Day doing it. It’s an American flag design flying when Ohio became a state. We love it. Always have dreamed of having a “Quilt” Barn, but would need that barn first. Fun to look for those when traveling. ~Best
Enjoyed seeing your pictures and reading your description of the work. I intend to do something like this around my front beds. I like the extra space outside the rock border, to help keep grass out of the beds. Great tutorial ! Thanks.
Looks great! I always had a gap between the lawn and my rock borders precisely for the mowing ease. I think it looks better that way too. :)
It’s so pretty Ann. I too had this idea of a rock boarder for my garden. I live in Oklahoma. My husband and I just retired so I decided that in our motorhome travels I will find big pretty rocks from all over the country and make my boarder one rock at a time And One Trip at a time. We started it in May. So we already have a few rocks. I can hardly wait to go again to find some more to add to it. We will go so on. I’ll let you know how it comes out.
Have you seen the movie Long Long Honeymoon? Lucile Ball and Desi Arnez collect rocks in their travel trailer and they get all weighed down, you gotta watch it!
Very beautiful work. My daughter is building a similar thin in her garden and asking my advice.
One more thing might help you an her getting less work. Putting a garment under the soil to prevent
any grass from growing by the stone border. What is that garment called, my language is finnish?
Thank you for the Idea.
So lovely! I just redid a portion of my rock border. Now I have to redo it using this method! We need to live next door to each other so I can copy in real time. :)
I love your border. The snow was pretty hard on all things garden around here. Lots of heaving in the hardscapes. Bet you were tired after you finished redoing this border!
Oh Ann, I can totally relate to not wanting to go back inside! Here in Kentucky our winter was so unusually severe and lonnng! I have vowed not to complain about the heat or any part of this summer! And haven’t we been blessed with the best spring? I love your rock border! Have half heartedly started one of my own with found rocks-thinking I will bite the bullet and purchase some rocks. Thanks for your inspiring posts!
I am not going to complain about the heat either…I may think it but I’m not saying it out loud!
It’s just beautiful Ann!
I didn’t even realized that you had to “tend” to a rock border! But, I surely see the difference in your before and after pictures. Looks wonderful, Ann!
Ann, your rock border looks terrific! We have a bed in our front yard that’s edged with rocks. I’ve never thought to dig them up so that they’c be more prominent! Well, I want to enlarge the bed this fall so I may get around to it then. It’s already too hot here to pick up rocks! Leo puts an edge around our beds by turning the weed eater on its side, digging into the dirt a bit. He saw some landscapers doing it years ago and has been doing that since then.
Yes I have seen the weed-wacker trick. My neighbor does that and I love it. I have no desire to try and do that myself though! I agree…it is getting too hot for this sort of thing. I’m not complaining though!
Looks fantastic, so sad you had to pay for rocks. I just pick the farmers fields for free but normally end up with poison ivy :( Pinning!
I have a rock border but I haven’t redone it in several years! This will inspire me to get it done soon. I’ve never bought this kind of rock, just picked them along roads whenever I can, much to my hubby’s chagrin! Must admit I’ve bought much bigger rocks used around the garden, the latest weighing about 200 lbs!
Love it…it looks fantastic! Buying rocks? Yeah…I’ve done it…but then I have a problem. Hello, my name is Donna, and I have RCF…Rock Collecting Fever…alas, there is no cure…except for more rocks! ;)
I know what you mean Donnamae! I literally could not sleep until that border was finished and the only way to get it done was to buy rocks. I have no regrets!
This was such a helpful post, Ann. We live in a fairly new subdivision, and each home is landscaped by the builders, using rocks to edge the flowerbed borders. While we have replaced the cookie-cutter plants that were initially put in, we’ve left the rock borders on the front beds. There is the black edging material in place that I am not overly fond of, and I like your idea of the 6 inches cut away from the rock edge. It looks nice and will make mowing easier. Thank you for sharing this!
You are so welcome! I used to have the black edging too and was so happy when I was able to pull it all out. Good luck with your new house!
I love your rock edge….
Thanks for the inspiration! It’s 89 degrees here in Miami and the daily afternoon rains have started….. so I’ll ask my son to do it! ;)
it looks great, I laughed when you said who buys rocks, it made me think of the day someone helped themselves to the rock border on our driveway, they hauled away all our rocks on the one side of our drive!!!Your yard looks lovely and your helper is a beauty!!! Much to regal looking for garden work, she must be the supervisor lol,
Hi Laurie! It’s so good to hear from you…and I would have a heart attack if someone stole my rocks! I’ll be by to visit your blog soon. It’s been a long time…Ann
Great tip Ann…and I am passing this on to my hubby too!!! Happy Monday!!…Love your helper!
You must not live in the South!!!!!!!!!!!!!!!!!! My yard is full of Rocks and Georgia Red Clay . You did a great job it looks very pretty. What is your beautiful assistants name ?
No I live in Northwest Ohio…and there isn’t a rock to be found! We do have a little clay though. My little dog’s name is Kelly. She’s pretty much my third child instead of a pet!
It looks so neat!!!! I love rocks as edging, so casual and cottage perfect!!! And I love your helper, I had a Gretta just like your baby doll, she was my heart. Wish I had my flower gardens in as good as shape as you do, maybe by this fall I will!!! It’s in the 90’s here today so not much will get done. Maybe tomorrow. LOL. Have a great day.
Love the name Gretta for a schnauzer!
I love and adore rock borders! I have them front and back also. And like you; I had to buy the rocks too. I mixed on some of the “Hubby has to move” sizes with the smaller easier to manage ones and loved it so much in the front I added it to the back. (Well, I am almost done in the backyard).
I have my grass butted right up to the border which in the past makes it hard to trim, but using a garden blow torch (not for the faint of heart) works wonders on trimming around rock. I think my assistant and your assistant are on the same page too….She hangs out in the shade while I’m sweating to the weeds…..Great post, I loved seeing your border!
Garden blow torch? Oh my goodness I don’t think I could handle that! I bet it does the trick though. Good luck with finishing your borders!
Looks fantastic Ann!