


Two methods for making a DIY burlap table runner with tassels. Just follow the easy, no sew, step-by-step tutorials for a custom burlap table runner that’s the perfect accessory for farmhouse or cottage decor.

Burlap has been around for hundreds of years, and it’s still one of the most popular decorating accessories today. Fringed burlap has a rustic look, and it’s the perfect addition to cottage or farmhouse decor.
There are two different methods for making a burlap table runner included in this post, and both of them have darling tassels. Method No. 1 uses burlap fabric that needs to be prepared and straightened. Method No. 2 uses no-fray burlap that comes on a roll.
*Affiliate links (Amazon & others) included. Click HERE for my Disclosure Statement.
This post may contain affiliate links. See my disclosure statement.
DIY Burlap Table Runner with Tassels: Method No. 1
Here’s what you need:
Step 1: to figure how much burlap you need, measure the length of your table. A 12 inch drop on each end is plenty, so take the length of your table and add 24 inches. For example if your table is 70 inches long, you will need 94 inches of burlap. That comes to 2.6 yards, so I would recommend buying 3 yards. Always round up the amount you need when working with burlap.
Step 2: prepare the burlap: This is not a necessary step, but one I highly recommend. Washing and drying the burlap will make it so much easier to straighten (and iron.) Click HERE for my post on how to prepare burlap.
Step 3: decide how wide you want your runner: Most runners measure between 15 and 20 inches wide. Add 2 inches to your desired width measurement. Now you should have the length and width of your runner. Following the method explained in my post, cut a piece of burlap to this measurement.
Step 4: at your ironing board turn over the long sides of the runner about 3/4 inch and press well. Both long sides now have a finished edge. We will adhere the edge later.

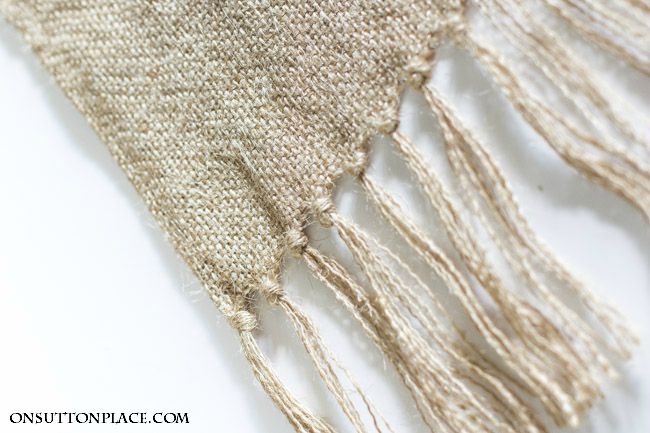
Step 5: now you have a right and wrong side to your runner. Start pulling the vertical threads from one end until you have a fringe about 6 inches long. Repeat with the other end.

Step 6: working from the sides of the runner in, start making knots as close as possible to the edge of the burlap. Use 7 or 8 strings per knot. When you get to the middle, you may have a couple of knots with slightly more or less strings. Just fudge a little to make them as even as possible. Remember this is hand-made, so don’t worry about the knots being perfect.

Step 7: when each end is knotted, at your ironing board, tuck fusible webbing tape along the folded-over sides, and press well. This will finish off the sides of the runner nicely and prevent any unraveling.
Press your runner one final time. That’s it…you are finished! If you like burlap, but prefer a more finished look, this runner is for you. It takes a little time, but it’s easy, and the end result is really pretty.

Burlap Table Runner with Tassels: Method No. 2
This method for making a burlap table runner is not only super easy, it’s quick & budget-friendly. Unlike the first method that uses burlap fabric, method no. 2 uses no-fray burlap that comes on a roll. Think of it as a very wide roll of burlap ribbon.

What you need:
**I did not wash the roll of burlap before I made the runner below. The roll did not smell, and I liked the fact that it was slightly stiff.
Step 1: Begin by deciding the length of your runner. The width is already decided, since the roll of burlap has finished edges.
Step 2: Cut a piece of burlap to your desired runner length, plus 4 inches. I did not want my runner to drop over the edges of our table, but that is a personal choice.
Step 3: It’s time now to straighten the ends of the runner. Keeping your runner measurement in mind, pull a thread from each end of your piece of burlap, forming a channel. The distance between the channels should equal the length of your runner.
Step 4: Using the channels as a guide, evenly cut the ends of the burlap.
CLICK HERE FOR MORE INFORMATION ON HOW TO STRAIGHTEN BURLAP.
Step 5: Pull threads from each end of the burlap until you have fringe about 6 inches long.
Step 6: Working from the sides of the runner in, start making knots, as close as possible to the body of the runner. Use 7 or 8 strings per knot. When you get to the middle, you may have a couple of knots with slightly more or less strings. Just fudge a little to make them as even as possible. Remember this is hand-made, so don’t worry about the knots being perfect.
Step 7: Iron the runner and enjoy!
Handy Quick Links:
- burlap table runner with ruffles
- easy, no sew burlap table runner
- how to cut burlap (includes how to wash burlap & drying tips)
Great post this week! Always enjoy your blog!
I love burlap but was warned that fibers can be released that are harmful to lungs when you cut it and work with it. Wondering if washing it will remove those harmful fibers? I certainly hope so because I can’t wait to make one of these! However I’m not clear on just how to make the knots. Wish there was a video. Maybe I missed it? Look forward to clarification.
I have never heard anything about burlap fibers being harmful…so I am not sure about that. Washing the burlap softens it and makes it fluffier. I can help with the knots if you could be a bit more specific? And I’m sorry but there’s no video. That’s a bit out of my comfort zone!
Please explain what it means to make knots?
Taking the strands and make a knot with them, close to the body of the runner??
Yes exactly! I will add that to the post. Thank you!
Hi Ann,
Just wanted to let you know I made this burlap runner the first time you posted the instructions. I still use it every fall and it still looks great! I am a big fan of your blog and love that your ideas are simple and doable without a lot of fuss or money. Keep up the good work!
Thanks, again, Ann for the instructions for this runner. You always give us such great instructions. They are so easy to follow! I am definitely going to make another one. Have a great day!
I so appreciate that you are willing to share your tremendous talent with us. I want to emulate everything I see because it feels so serene. Thank you!!!
Thank you for taking the time to leave such a lovely comment. I truly appreciate it!
Wow….another wonderful idea to use in our fall decorating. Yes, FALL is in the air and all over the yard! Thank you so much for your blog which I read and look forward to daily.
hi, my burlap runner width is 11.5,so what can I do ?
Hello…I’m happy to help but can you give me a little more information?
My first burlap DiY is a success thanks to you! Easy to follow directions and also used information from post about how to wash and dry burlap. You made it look easy and it was!
Yay Heidi I am so glad…thanks for letting me know!
OMG, Ann! This is beautiful! Now I want to make one using green burlap!!!
Hi Ann…..Love this runner. So simple and pretty.
I am not a seamstress, so this project is right up my alley. Do you have a problem with the burlap “shedding” even after prewashing?
Hi Karen! Well the burlap just sheds naturally. Once you wash and dry it plus shake it out most of the shedding is behind you. It’s very important to shake the daylights out of it!
i just bought some burlap to trim out my family room curtains, so your post on washing and preparing it came at just the right time. LOVE this runner! So simple and stylish.
Thank you Loryl! Good luck with your curtains. :)
I love this runner. So very simple and easy to make. I would find it just as easy to machine sew the side hems. Either way would be just fine. Thanks for sharing such well written instructions.
Yes sewing the sides would work perfectly. I made it a no sew project for those who don’t have a machine!
What a simple and stunning project.
Thanks this is something i have wanted to do and now i know how. I know you can’t read my mind but sometimes i truly wonder lol Have a great day and thank you Ann.
Oh Marlene this made my day. I sometimes wonder if the things I come up with are of any interest so thank you for taking the time to leave such a nice comment. :)
This is a perfect project for me, Ann! I’m not a huge fan of burlap, due to the smell/wrinkle and the ‘slightly-too-country for me’ look, but your excellent tutorial has given me reason to reconsider. The tassels give the table runner a casual, yet timeless look. Very happy w/your instructions on how to prepare the fabric, as well. Thanks again, Ann. Really love your blog!
Thank you Laurie! I wasn’t a big fan of burlap either but the more I use it the more I love it. I’m not a huge fan of raw edges so this was a great alternative.
Who knew burlap could look so classy! I love this.
I love burlap ANYTHING! I have have made fringe with flannel before but haven’t tried it with burlap. I’m going to give it a try. The little tassels are cute!
Another wonderful classic design project, with a twist! You always deliver beautiful projects, clear concise instructions with a great eye for detail! Love your blog!
Thank you Lauren!
Ann,
Love your casual, refined style! I’ve not been a huge fan of burlap but have a few items that my daughter has crafted that are really nice. This project makes the burlap look more refined and classic and is so approachable for the ease. This tutorial is also beautifully crafted. Thanks for sharing!
You are more than welcome Beverly!
I love the look of burlap and I adore its raw texture. Thanks for sharing this project!
Best,
Michelle from simplysantabarbara.blogspot.com
Ann – You need to put this in your shop!
Julie
What a fantastic project for fall decor! I am enjoying decorating with burlap a lot lately and will definitely be adding this to my project list. I absolutely love your blog Ann!
Thank you Dorene…have fun!
I loved the burlap fringe table runner. I have made several burlap table runners but decorated them w/lace etc. I thought the simplicity of this one was exceptional. I have never washed the burlap but intend to before I do my next project. Love your posts Ann….
This is why I love your blog, beautiful simple projects with great tutorials that anyone can understand, your instructions are so easy to follow. Thank you, thank you, thank you.
Patty you are more than welcome…thank you for the lovely comment!
I love your runner Ann! It will be perfect for the upcoming Fall season.
want to try this…so beautiful
Ann-
You did it again…another easy project perfect for fall decor! Great tips for working with burlap.
Thanks. Have a great Sunday.
What a great project for fall decorating, so simple, yet elegant
Thank you, Ann.
Hi Ann,
A good step-by-step tutorial on the burlap runner! It’s so appropriate that you post this as the days are hot but the night is cool (great to sleep!). I can almost smell autumn in the air and my mind must shift from summer to fall.
Hugs from Canada!