


Make this adorable DIY Christmas Garland from wool felt balls and trim your tree in style! This is an easy and quick Christmas craft that adults and children alike will love.

Welcome to a very fun Christmas craft session! The project I’m sharing today is something I’ve wanted to do for several years, and I’m so happy I finally pulled it together. I have loved wool felt since I was first introduced to it many years ago. The softness and texture cannot be found in any other fabric.
This post may contain affiliate links. See my disclosure statement.
What is Wool Felt?
It’s important to know that wool felt, and felted wool, are not the same thing. Wool felt is fabric made from wool fibers (picture wisps of wool) that are pressed together, and there is no weaving involved. It’s available by the yard, and sometimes in smaller squares. The mills that produce wool felt are few and far between, because the process and machinery are very specialized. Felted wool is actually woven fabric made from wool thread that has been washed in very hot water and dried. The hot water process, or felting process, makes the fabric softer and fluffier. The same hot water process can be used with wool felt. It completely changes the texture, and like felted wool, the wool felt becomes thicker and fleecier.
How To Make Wool Felt Balls
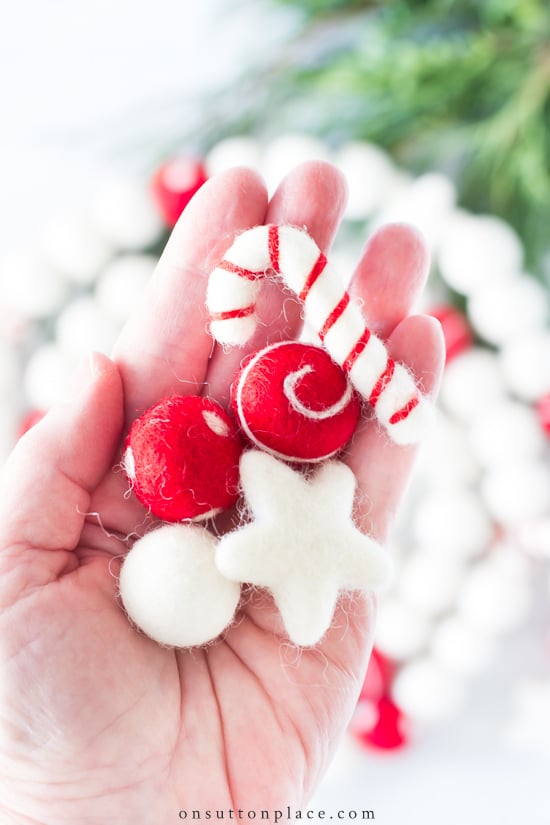
So what we’re working with for this project is wool felt. Wool felt balls are made by placing bits of wool (remember the wisps we talked about?) in hot, soapy water, and then rolling the soaked wool into a ball with your hands. I’ve never done it, but it appears that it’s just like rolling cookie dough into a ball with the palms of your hands. I know I could have made my own balls for this project, but even though it’s easy, it would have been time-consuming. After a quick search on Etsy, I decided to buy the darling pieces pictured above.

- As you can see in the image above, it takes about 12 wool felt balls to equal one foot.
- The wool felt balls used for this project measure 2.5 centimeters, which is about 1 inch.
- If you want to make a garland that is 6 feet long, you will need approximately 72 wool felt pieces.
- The wool felt balls come in various sizes, with 1 centimeter being the smallest, and 4 centimeters being the largest.
- I opted for balls that were right in the middle of the range of sizes available.

Supplies Needed
*As an Amazon Associate, I earn from qualifying purchases.
- twine or heavy thread
- large sewing or darning needle
- white wool felt balls
- red + white wool felt balls
- stars
- candy canes
- 36 piece set of red + white wool felt Christmas pieces
- For more options, visit The Felt Pod on Etsy.

Garland Assembly
- Cut a piece of twine the desired length of your garland, plus 15 inches. You will need 7 inches on each end to use as a hanger.
- I started and ended with a star. Thread a large needle onto one end of the piece of twine. Run the needle through the star.
- Continue adding the wool felt pieces to the twine. I alternated 3 white balls with the red balls, stars, and candy canes.
- To finish off the ends, make a large circle and knot it off as close as you can get to the end of your garland.

When I got to the end of my garland, I fudged a little. If you look at the picture below, you will see that my last section (on the right side) is missing a candy cane group. I thought about starting over, but decided to just go with it. Handmade items aren’t always perfect! The finished length of this garland is about 6 feet, and there are 74 pieces.

Handy Tip
If it’s difficult to pull the needle through the felt ball, a small pair of pliers makes the job easier. You can also use a thimble to push the needle through.

Garland Ideas
The possibilities for this sort of Christmas garland are endless. The wool felt balls come in a huge array of colors. There are stars, candy canes, peppermints, little reindeer, red hearts, embroidered snowflake balls, an adorable Santa belt, and more. Another idea when assembling the garland is to leave a space between each ball. Make sure to use a thick piece of thread or twine so the balls don’t slip. Even if they slip a little, they can always be arranged once your garland is in place. If you want a really long garland, this would be the most cost-effective route to go.

CHRISTMAS
GARLANDS + ORNAMENTS
We are all in that odd time of year where we are preparing for two holidays. I’m definitely still planning and preparing for Thanksgiving, but I know I need to get started on Christmas as well. The month of November is challenging. This is the month where we especially need to take care of ourselves. So even though our first inclination is to put ourselves last, don’t do it. Taking time for a craft session might seem impossible, but it will brighten your day, and make you more relaxed. So move yourself up the list…and I bet that everyone in your life who loves you will thank you for it!


Wrapped With A Bow
Unlock the art of beautiful gift wrapping with this free guide,
and turn every present into a magical moment this Christmas!
While I don’t believe in the word “perfect Christmas ” which places expectations on us…I do like the felted ornaments. I’d like to know where that small tree came from. Link?
I’m sorry Nanci…the tree is no longer available.
Such beautiful wool ornaments and very pretty for a fun tree. Another great idea, thank you hope your move goes well
I just placed a huge order for these little lovelies!!! I cannot wait to make these felt garlands with my daughters and Grands!
We just love Christmas and this will be such a fun and an easy craft for them, of course I or my daughters will do the stringing. But for little 2, 3, 4, and 5 year old’s they can pick out and hand us the balls, stars, and candy canes with out any fuss, mess, or worry.
Still my favorite Blogger! Your wonderful ideas and recipes just keep coming!
Thanks so much !
Oh Ann can I just say how refreshing it is to have a lovely craft from USA that doesn’t involve a trip to dollar tree or such store. Here in Uk that makes most of the lovely crafts that I torture myself by watching on you tube impossible to re create. So thank you.
Great project. Would like to do a sports tree for my grandchildren. Just need to know how big your table top tree is so that I can figure out how many felt balls to purchase. I bought a 3′ tree. Thanks for your help.
Hi Jan…the little tree featured in this post is 24 inches tall. Have fun and happy holidays!
This garland is darling. I got right on Etsy and ordered the supplies. I cannot wait to hang it on my mantle.
I love this so much and have already ordered my supplies! Thank you!
The garland is just darling!! Thanks for sharing.
Taking time for ourselves, wonderful reminder. Love the darling garland you made – so fitting for a tabletop tree. I, too, switched to a tabletop tree a few years ago. I decorate my wider interior doorways now & am able to use more of my favorite ornaments.
Dear Ann… I love this, going to get going on this ASAP! Instructions are spot on! Trying to get away from large trees as I get older…small trees offer many avenues for creativity and are fun to decorate! On a mission to find tabletop trees that are worthy of being decorated…I love the flocked tree you’ve chosen for these decorations, where did you find it? Enjoy your day…stay safe, stay well💕
Hi Diane…the little tree featured in the post was a TJMaxx find a few years ago, so I don’t have a source. I wish I could be more help!
Lovely idea and beautiful execution. Thank you for always providing step by step instructions, a materials list and your sources. So appreciated. BTW, I still use the grainsack dreidels you made for me each Hanukkah (which this year we are having to celebrate before Thanksgiving because… 2020).
Oh, I love this garland! Such an easy to follow tutorial, too! Thanks so much for sharing!