

No Sew Burlap Ruffled Runner Tutorial. Easy directions to make a custom burlap table runner that requires no sewing. Uses ready-made ruffled trim.

As one who loves to sew, I have found that sometimes adapting a project to make it “no-sew” is tricky. That’s not the case with this no sew burlap ruffled runner. Using a hot glue gun made putting this runner together quick and easy.
*Affiliate links included. Click HERE for my disclosure statement.
This post may contain affiliate links. See my disclosure statement.
Burlap Runner Supplies Needed:
- burlap
- ready-made ruffled trim
- scissors
- glue gun with glue sticks.
- I got the printed burlap at JoAnn, but it is no longer available.

The measurements of my runner are 20 inches x 50 inches. You can, of course, make your runner any size you want. For this size, I would recommend getting 1 3/4 yards of burlap. Most likely you could get away with 1 1/2 yards but that would be cutting it close at 54 inches. When you prepare the burlap, you will lose a few inches on the ends because it gets shaggy.
How to Wash, Dry, & Cut Burlap
No Sew Burlap Ruffled Runner Tutorial
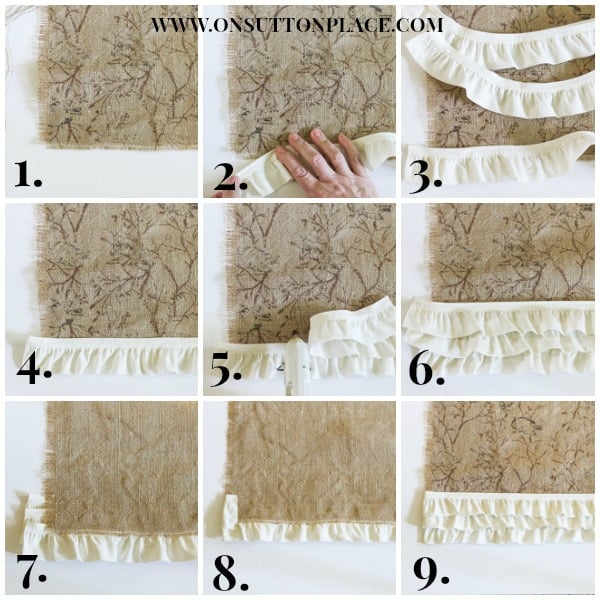
1. Prepare your burlap. Here is my tutorial on How to Wash, Dry and Cut Burlap. After you have prepared your burlap, cut a piece that measures 20 in. wide by 50 in. long. These are basic start measurements. You can make your runner any size you want. On the long sides, pull out 6 strands to create a fringed edge.
2. Cut 6 pieces of ruffled trim in 24 in. lengths. Begin attaching the first length of ruffle with a hot glue gun.
3. Let the ruffled edge hang off the end of the runner to cover the raw edge.
4. Make sure to leave a 2-inch overhang on each side of the runner. Run a bead of hot glue along the runner and completely attach the first ruffle. Work in about 5-inch sections.
5. Using the same method, glue the second row of ruffles above the first row.
6. Repeat again for the third row. Now rotate your runner and glue 3 rows of ruffles to the other end.
7. Turn the runner over so the back side is facing up. Trim the ends of the 3 rows of ruffles so they are even, 1 inch from the edge of the runner.
8. Glue the ends down so they are neatly attached to the back side of the runner.
9. Repeat steps 7 and 8 for the other end of the runner. Press well.
Handy Quick Links:
- how to make a burlap table runner with tassels
- easy, no sew burlap table runner
- how to cut burlap (includes how to wash burlap & drying tips)
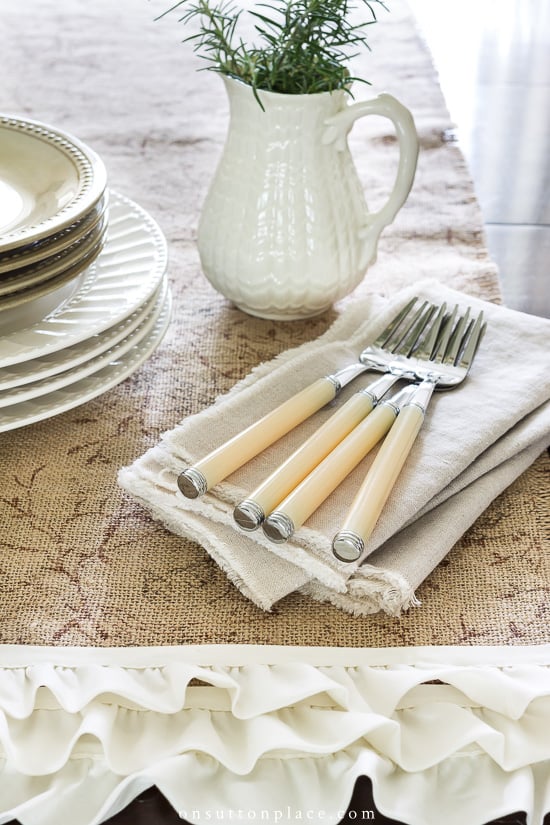
This does not have to be exact or perfect. The ruffles are very forgiving, so if they are a bit wavy, don’t worry about it. You can make this design your own by adding more rows of ruffles, or using a wider ruffled trim. Use this no sew burlap ruffled runner tutorial to make a custom runner that reflects your own personal style!

I love the washing of the burlap. I’ve wanted to use it, but it’s so stiff and smelly. Thanks for sharing these amazing tips. I also love the tied version of the runner. Very artsy!
I love this burlap runner – just a couple of questions though – first where do you find printed burlap and secondly and this may sound strange but does the burlap have an odour. The reason I ask is that I purchased a burlap runner off an Etsy site 2 years ago and I had to wash and wash and wash it before any of that awful burlap smell would start to soften. Thanks and again love the one you showed.
I like this project. I’ve looked all over for that printed burlap fabric because I want it—-BAD! Anyone know where I can get it?
Hi Sonya! I got the printed burlap at JoAnn Fabric. Thanks for stopping by!
Ann – I always look forward to your printables & I hope that’s what you are going to be doing.
Love the very cool burlap print…the best I have seen! Cool project
Ann, I noticed your new font on your pinnable image immediately! LOVE it and the runner as well. I almost purchased a fall runner at Hobby Lobby but hesitated. Now I can make my own! Thank you sooooo much! Pinning!
You are making me rethink my lack of appreciation for burlap. You make it look so pretty I may have to give it a whirl, maybe using your techniques will make it more enjoyable for me. I have seen some burlap that is hand painted and the texture gave it such a gorgeous vintage look.
I hear you Pamela! I was a burlap skeptic too. Give it a try!
Love your runner Ann! You know this is right up my Alley:)
Pretty! I have a round table but love this idea.
How beautiful! I love the white ruffle with the rough burlap, and the pattern on the burlap – oh you are so creative!!
Love your work.
Have a great week xox