

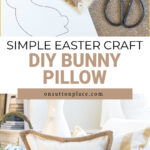
A simple DIY burlap Easter bunny pillow with an easy stencil method. A charming spring accent made with basic supplies and clear steps.

This DIY burlap Easter bunny pillow is one of those simple projects that adds just the right seasonal touch without feeling fussy. Made with a basic stencil technique and easy-to-find supplies, it’s a relaxed way to bring spring into your home. Whether it’s styled on a bench, chair, or sofa, this pillow works nicely with neutral decor and can be pulled out year after year.


This post may contain affiliate links. See my disclosure statement.
How to Make A Burlap Bunny Pillow
- Download and print the bunny template.
- Cut a 12 x 12 inch piece of burlap or other scrap fabric.
- Cut out the template. Card stock makes it easier to trace, but regular paper works fine.
- Cut a piece of Wonder Under the same size as the burlap. Using a hot iron, fuse the Wonder Under to the back of the burlap following the package directions. Let it cool completely.
- Trace two bunny shapes onto the Wonder Under side of the burlap, making them mirror images. Cut them out.
- Peel the paper backing off each bunny.
- Press the pillow cover so it is smooth and wrinkle free. Place the bunnies on the pillow cover and iron until fully adhered.
- Attach the tail embellishments with a hot glue gun.

Bunny Tail Variation
When I first gathered supplies for this project, I hadn’t chosen the bunny template yet. I pictured the bunnies being a bit smaller, so I went with smaller flowers for the tails. You can easily adjust this detail to suit your own style. Larger flowers make more of a statement, and small white pompoms add a softer, playful touch. It’s a simple place to experiment and make the pillow feel just right for your home.
JOIN THE OSP COMMUNITY
Sign up to get uncomplicated recipes, unlimited seasonal decor, and
understated ways to refresh your home sent straight to your email inbox!

Spring Ideas


amazon storefront
Discover simple and affordable
ways to refresh your home.
Follow my Amazon Storefront
for all my favorite finds!
I just love this idea and how cute the pillow turned out! I was excited to share your post link with my followers in my From My Neck of the Woods weekend round up this past Sunday. ~ Kristin | White Arrows Home
Love the bunny pillow. It is so clever! Thanks for all the great ideas you send us everyday. ♥
Ann, such great ideas! Thanks for sharing your favorite things. Your blog is always so inspiring.
This is so cute! Love how it turned out!
So darling. Your site is absolutely beautiful!
Hello Ann! Love the bunny pillows!
Can hardly wait to make one.
Thank you for sharing!
Ann, the bunny pillow is so cute! My married name means “hare” in Polish so I am partial to any bunnies!
Ann, I love all your no-sew projects! I really want to make one of these bunny pillows but I’m thinking that I’ll use some printed fabric. Oh, you really have my wheels turning now!
Ahh…so cute! I need to make one of these. Since I have a burlap-covered pillow, thought I might cut the bunnies out of muslin or some off-white cotton quilt batting that I have. The “flower tails” are sweet.
Thanks for the idea!
Adorable! I love those little flowers for the bunny tail. I am pretty sure it was bunny tracks in the snow this morning when I went out. Will spring ever come?
I just finished my pillow following your directions! It was easy peasy! I did use tiny white poms for the bunny tails because I didn’t have any flowers that were suitable….Thanks for the easy step by step directions! I also am using some fun spring scrapbook paper with the bunny template to create a banner for my mantle…This brightened my afternoon. We still are having freezing rain here! Bring on spring!
Oh…sweet bunnies, Ann. I have one of these pillow covers. My granddaughter-in-law will have a surprise in the mail this week
Ann,
This pillow is darling! I plan to make one right away…It’s such a cheerful way to add a springtime touch to the home. Thanks for sharing!