

As promised, here are the details on the board and batten wainscoting we added to our dining room. Thank you for your patience while I gathered everything together. I want to share as much information as possible, but it’s important to note that this was not a DIY project. I’m always happy to answer questions, but there may be details I simply don’t have answers for. That said, board and batten wainscoting can absolutely be a DIY project if you have the right tools and are comfortable with precise measuring. The measuring alone was enough to make my head spin. Before getting started, I spent quite a bit of time gathering inspiration images so I could clearly communicate the look I wanted. There are many different ways to install board and batten, and I wanted to be as specific as possible.
This post may contain affiliate links. See my disclosure statement.
Board and Batten: The Planning Process
When the carpenters first came to take measurements, I showed them several photos of board and batten wainscoting that reflected the style I had in mind. After looking everything over, they were confident they could recreate the look, which immediately put me at ease.
On the first work day, they spent about an hour in the dining room taking detailed measurements and lightly sketching the layout directly onto the walls. After that, they invited me in for a walkthrough and question-and-answer session. This part was surprisingly enjoyable, and they were incredibly patient as we worked through the details together. They explained that the wainscoting would be assembled directly on the walls, one piece at a time, rather than built as panels elsewhere and installed. Here’s what we discussed:
- Spacing, panel size, and overall height
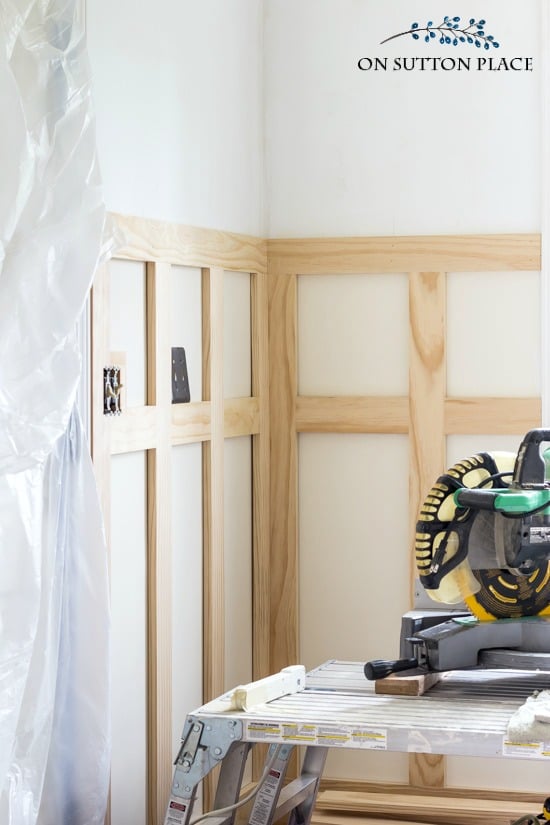
- How electrical outlets and switches would be handled
- Trim options for the panels, including several profiles to choose from
- How the paint would be applied
- The overall installation process

Choosing the Height of the Wainscoting
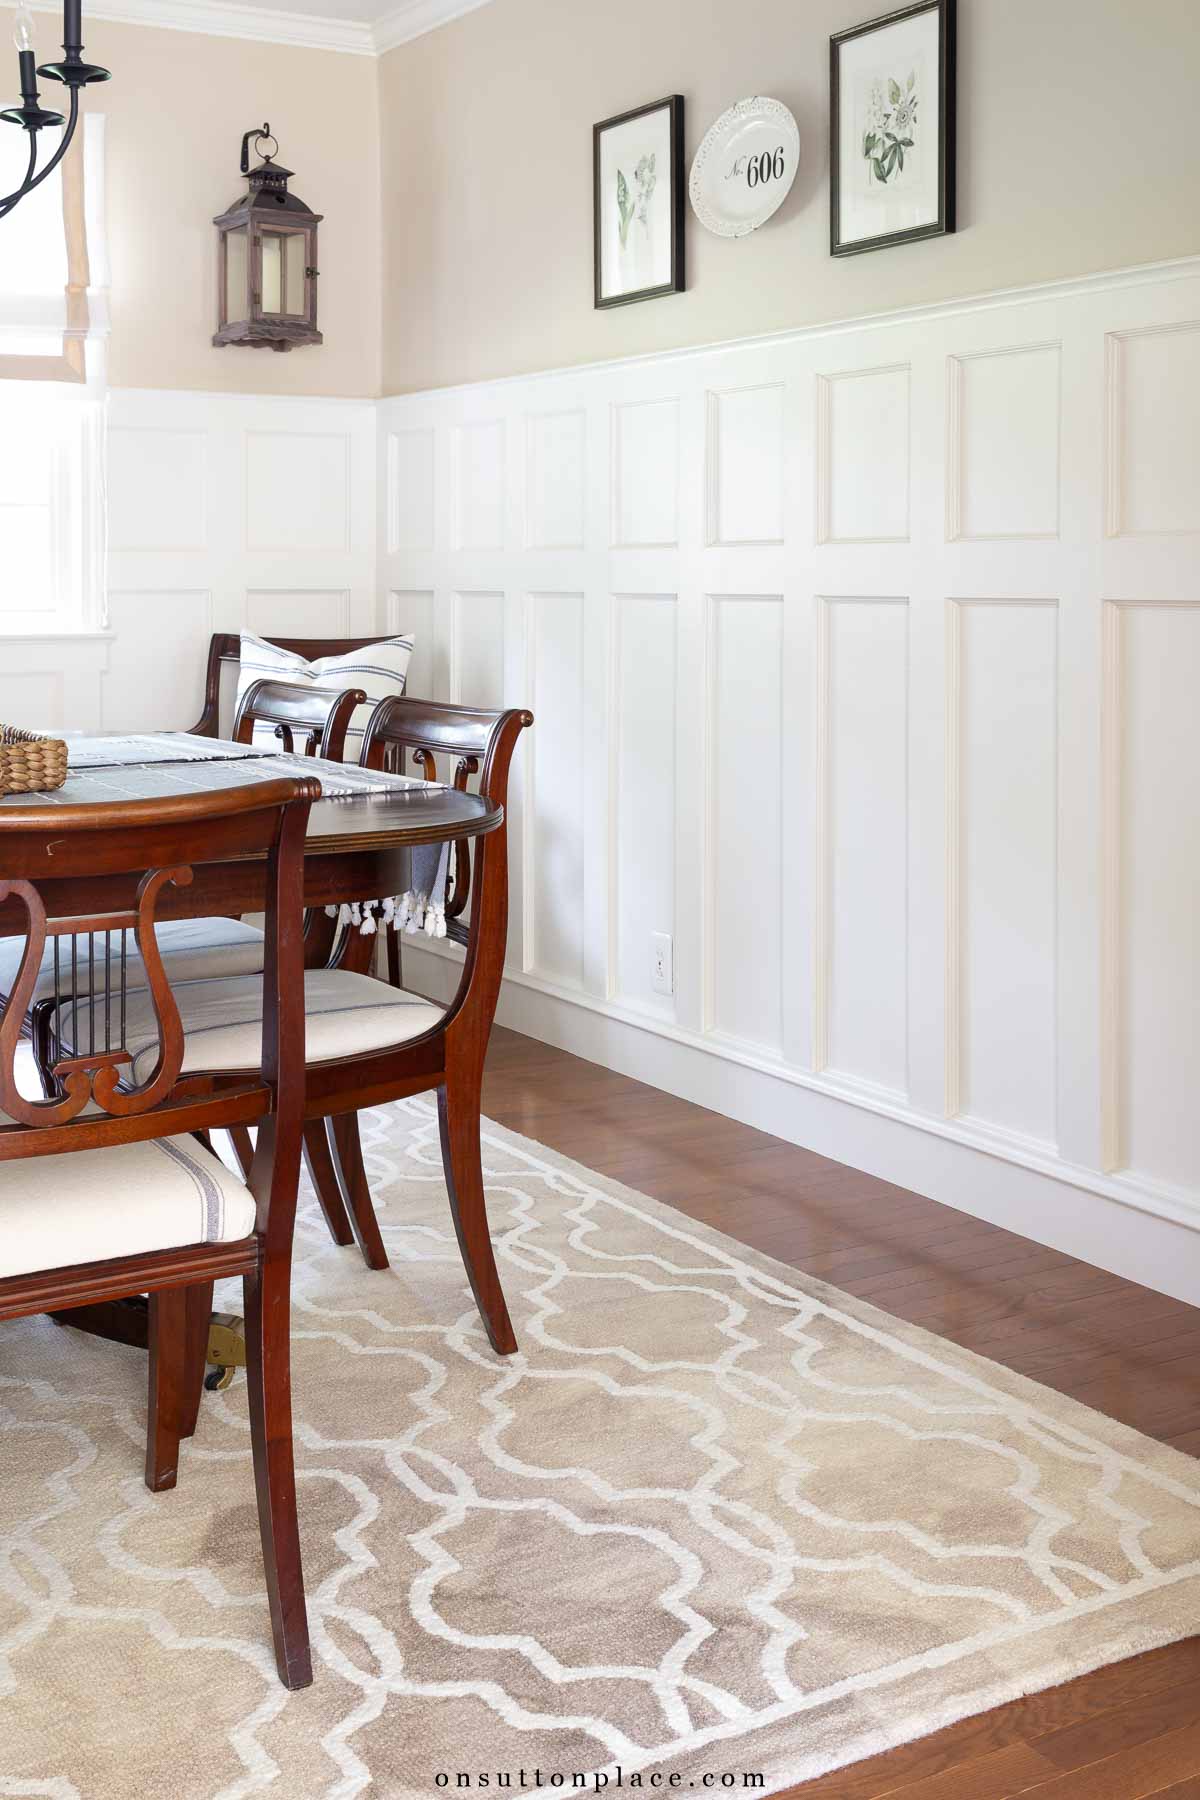
I’ve received several questions about how we determined the height of the board and batten, and the honest answer is that it’s largely a personal decision. One helpful guideline is to align the height with an existing architectural element in the room, so in my case I matched the height of the wainscoting to the midpoint of the windows. Because the dining room is small and has just one set of windows, the choice felt fairly straightforward. I knew I wanted the wainscoting higher than the window sills, but stopping at the top of the windows felt too tall for the space, and the middle line struck a comfortable balance that felt right for the room.
Board and Batten Wainscoting Assembly
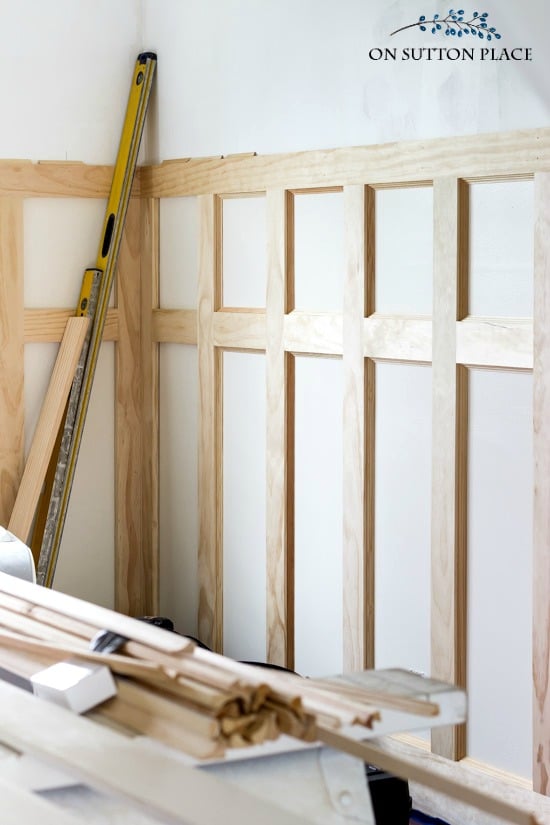
- The first pieces installed were 1 x 6 pine boards, which served as the baseboard.
- Next came the vertical boards, followed by the horizontal top board.
- From there, each remaining piece was added individually, moving from one wall to the next.
- Because the project required so much detailed cutting, the carpenters set up their miter saw directly in the dining room.
- To control dust, they taped plastic over the doorways and window. One especially smart step was placing a fan in the window facing outward, sealed with plastic. When the saw was running, the fan pulled dust out of the room. The result was impressive. Very little dust made its way into the rest of the house.

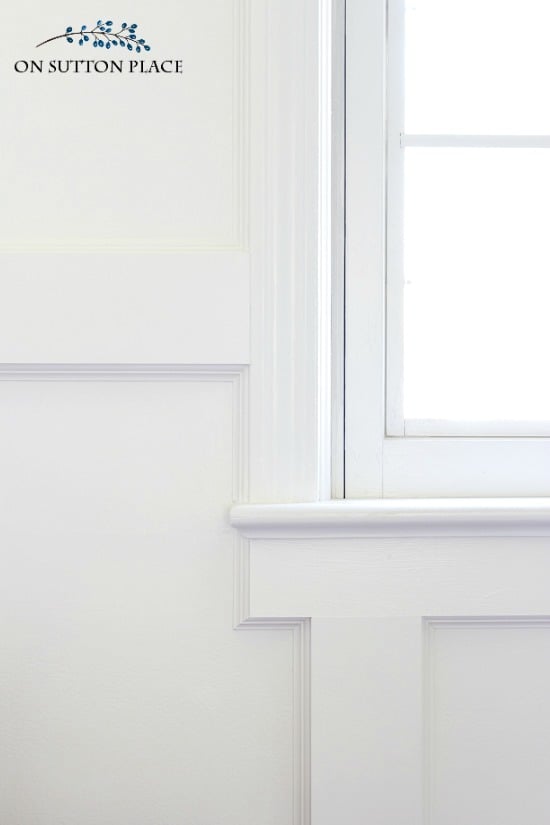
The Detail That Made the Difference
The feature that truly took this board and batten wall to the next level was the molding installed inside each square and rectangle. I went back and forth on whether to include this detail because it added time and cost to the project. In the end, I’m so glad I said yes. That extra layer of trim gave the wainscoting a more finished and tailored look, and it completely transformed the overall effect. It was the perfect final touch and made all the difference.
If you’d like to see how this board and batten wainscoting looks once the room was painted and fully pulled together, I shared the complete dining room reveal in a separate post. I also walk through all of the paint colors used throughout our home, including the color on the wainscoting, for anyone who’s curious about the exact shades and how they work from room to room.

JOIN THE OSP COMMUNITY
Sign up to get uncomplicated recipes, unlimited seasonal decor, and
understated ways to refresh your home sent straight to your email inbox!


amazon storefront
Discover simple and affordable
ways to refresh your home.
Follow my Amazon Storefront
for all my favorite finds!
What color is the board and batten in this room? Thank you!
Hi Nikki…it’s a custom mix from Sherwin Williams. It’s very close to Alabaster. Thanks!
Fascinating! There is so much to learn on your blog! I’m so glad I joined! You are a wealth of information! Thank you!
Hi Ann! I just LOVE On Sutton Place. Thanks so much for sharing your wonderful ideas and beautiful home with us. I had a quick question about your gorgeous wainscoting. I see that your baseboard is 1×6. How thick are the other boards (horizontal/vertical)? 1×4’s? Thanks much!
Your room is lovely. I realize this is an older post, but can you provide the dimensions of each of the board and batten boxes? I am doing the same project in my dining room and am in the planning stages. I know how high I’d like the molding to go, but am having trouble figuring out the width to get the “skinny” look like you have.
Hi Beth! The width of the boxes (the outside edge) is 10 1/2 inches. The small boxes on the top are 12 inches long and the bottom boxes are 33 inches long. Good luck with your project!
Beautiful room. I don’t see the answer to the board sizes. 1 X 6 for the baseboard but is the rest of the boards 1 X 4?
I too love the added trim on the inside of the boad and batten! Where did you find your beautiful faceplate for your light switch? I love the added detail of brass screws, too.
I purchased 2 Wainscoting boards, had them cut in half, after getting them home they are giving off a chemical odor. Will that dissipated on it’s own? Do I need to treat the paneling?
Regards
Dave
Hi Dave…I’m sorry for the delay in answering. I was not sure how to answer you so I asked some DIY blogger friends who have experience with this sort of thing. They said that if the chemical odor stays after a few days, just apply a good primer. That will take care of the odor and also prep your wainscoting for paint. I hope this helps!
Classic! Georgeous! Good on you.
Everything looks so beautiful!
Hello! I’m a little behind on my email…but I am SO glad I saved this! SO beautiful! I was a big fan of your wallpaper, but this is just AMAZING!!
Looks wonderful!! :)
So, so very beautiful…it truly transformed the room. You must be so very pleased!
Oh Ann, thank you so much for your post “looks beautiful”. We did something like this in our home, but the painter used a roller (sponge) rather than brush, I have tried sand paper, but it still is not smooth. Someday when I retire, I will try to fix the wall areas! thanks again for sharing tips.
What a beautiful job! It looks perfect in your dining room. I have to show this to my hubby, maybe it will plant a seed of inspiration in his mind. Fingers crossed…
Absolutely stunning! The additional trim is well worth the extra time and expense. Looking forward to seeing your final touches.
Your dining room board and batten looks gorgeous! I don’t suppose your construction guys would make a trip to California to do my house though. Drat! I’ll be anxious for your final reveal when it’s complete.
Looks beautiful to me all ready. They did a wonderful job.
Looks awesome!
Looking forward to the reveal.
This is absolutely beautiful, Ann! I love the inside molding; it adds such a finished touch. How wonderful to have such excellent carpenters, too.
Absolutely stunning!
Where did the inside trim come from?
Hi Victoria: do you mean where was it purchased? If yes, I don’t know. My contractors bought all the materials and I don’t know from where. Thank you!
Oh my goodness! This is stunning! Thank you for all the details of the progress and decisions. We (“they”) are just finishing work on two of our three bathrooms today, and my head is about to explode.
I follow you with joyful expectation, because the age of your house is similar to ours and your taste is so classic. Oh, and we had the baked spaghetti the other night …
Thanks for writing Debra…and doing two bathrooms at the same time sort of blows my mind! Glad you enjoyed the baked spaghetti. :)
It looks beautiful and you were so fortunate to find these talented and thoughtful contractors. I’m sure it cost a fortune but it looks like a million bucks. Hope it brings a smile every time you walk into the room.
Can’t wait to see more pics ????
Lovely. It looks so clean and fresh. I love it. You mention windows treatments, pictures, & accessories…i think it looks beautiful as it is and would encourage you to consider “less is more” with all the extras. It is your home though so obviously do what pleases you and the DH. :) Just my opinion from seeing the beautiful pictures.
I think the dining room is turning out very lovely. What a job the board and batten treatment was, though. I wouldn’t want to attempt anything like that as a DIY either!
And do you remember how I said in an earlier comment that I didn’t particularly like the latttice pattern of the rug? Well, I just wanted to say I think the rug you chose looks very nice. And since you DO like the lattice pattern it is perfect! I especially like the grey color with the off-white pattern. It’s funny how something that you think you won’t care for can be quite pleasing once placed in an actual context.
Can’t wait to see the finishing touches!
Oh Ann, the inside trim is the wow factor of the project! I too think the way they did the light switch was genius!
Beautiful!
Such Fine, Fine work!! Lines are impeccable, the paint and color are superb! As we say in Cali, “NICE!”????
My goodness, Ann, this is just beautiful! I love the detail of the inside rectangles. It definitely takes it to a beautiful level. Fine woodwork by your crew! ♥
Looks so bright and fresh; very nice. I can see that the details are very professional. That’s the one thing that
make the job look perfect and sometimes some carpenters just aren’t great with details. Your floors are awesome; love the shine. Perfect for the dining room. Your home is very nice. Thanks for sharing.
One word Ann- Fantastic! I’m so impressed. They did a wonderful job and your height choice seems quite perfect!
Hello Ann,
Your board and batten looks incredible! It gives your room an authentic old-fashioned beauty that I love, and it’s definitely timeless and classic. Gorgeous! Having said that, I absolutely adore the wallpaper you used to have in your dining room. Would you mind letting me know what it was?
Hi Jenni, That wallpaper was from a discontinued book from Waverly called Williamsburg. I looked for it a few years ago and could not find it anywhere. Thanks!
This is classic and classy. The inner trim really did make a difference. Beautiful.
Magnificent wainscoting. I love it! I must admit one of my favorite parts is how they placed the electrical outlet. It does not detract at all. What a wonderful group of workers.
Ann, They did a beautiful job. I bet you are tickled pink every time you walk by the dinning room.
Ann, this is absolutely exquisite. The design,the workmanship, everything is top notch. You must be so thrilled with the outcome. Thanks for sharing these photos and ideas. Looking forward to more pics soon. Smiles from TN.
Ann, this is so beautiful! Just love those walls. Your carpenters did such a wonderful job. So happy for you that all the work is finally finished!
Blessings! Have a great day!
All the details on the board and batten make the finished product outstanding. The work around the light switch is amazing. Fogarty Construction does excellent work. Living through construction in your home is difficult at best but worth it in your case.
You had an excellent construction crew and their quality of workmanship speaks for itself. Very attractive. Yes, the extra layers were worth it!!
The end result looks absolutely beautiful, all credit to your talented craftsmen who translated your ideas into reality. As usual, your finishing touches complete the look. I think know I feel some inspiration taking hold….
Looks real nice, its finally all happening and know you are smiling when you see your beautiful room. Thanks for sharing.
Very nice work. Love the detail around the switch plate. You are lucky to find good workmen. I have had some bad experiences and it puts me starting anything new.
So beautiful!
Amazing! Beautiful addition!
WOW !! Absolutely beautiful !!
Stunning. quality , lasting workmanship.
Wow! I am impressed. They did a beautful job. I love the way they incorporated the outlets on top of the wood and the way they trimmed out and around the window. You were very fortunate to find true craftsmen. It looks awesome and you have to be very, very pleased.
Wonderful choice of finishes and excellent craftsmanship – everything is beautiful.
It is gorgeous!!!
So happy to see the first of the reveals of your new space. They did a beautiful job and you must be thrilled with the results. Can’t wait to see all the rest.
Ann, it looks so beautiful! The men did a really good job with all the details. I also like your new chandelier. Wainscoting is a classic look and adds so much to a room or space. I was wondering about wall art and where it should be hung and what size so I’ll be anxious to see your post on the finished room decor. Enjoy the nice weather.
Pam
Ann – WOW – just WOW!! This project turned out beyond expectations. The carpenters you chose really did an exceptional job for you. The detail molding really makes it. Don’t you absolutely love it when a ‘mind’s eye plan’ actually turns out. I could not be happier for you. Thank you for sharing with us. xoxo
Do you ever disclose the breakdown of your costs with a project?
Hi Nancy…yes I’ll try and do that with this project. I plan to do a final wrap-up post so I’ll include it then. Thank you!
I truly love it. That is what I would love in my LR and DR. It shows wonderful character.
I am not ashamed when I hire outside workers, some things (a lot of things) are beyond my capabilities.
I always “pick their brains” for projects I plan to do myself. Most people are happy to offer guidance,they know I will never be a business competitor.
It’s beautiful. I’ve always loved the look of board and batten, but your wainscoting takes it to a new level of elegance. How lucky were you with a great company who worked with integrity as well as mastery.
Your blog is one of my favorites. Please keep it going and going.
Hugs,
Judy
Stunning workmanship. I love the attention to each perfect detail. This is a timeless improvement to your dining room. Smiles
Beautiful!!! Such attention to detail and craftsmanship…so beautiful. Thank you for sharing. I can’t wait to see the final reveal.
I love the look of your new dining room, Ann! I’ve been wanting to install Board & Batten. to my dining room too! I’m pretty nervous about it though. My problem is, my ceilings througout the whole house are 12 ft. Is there a certain height recommended since my ceilings are so high? Or, do I go with what I like? Can’t wait for the final reveal on your dining room!
Hi Nancie…in my opinion, height is a personal choice. You might want to find some other feature in your room that would match the height of your board and batten. For example, we made the wainscoting the same height as the top of the bottom window. You can see what I mean in the first picture at the beginning of the post. This way as your eye travels around the room, there is one level line. I have seen very tall wainscoting and it looks amazing too.
Absolutely beautiful! I hope to replicate this some day in my dining room. The craftsmanship is wonderful, and I don’t say that lightly. We have builders and craftsmen in our family, so I’m very picky. So happy for you and look forward to seeing the finishing touches! Kudos to you and your workmen ????
Well done. You have exquisite taste. It’s amazing as I knew it would be.
Beautiful!
It’s just gorgeous. What craftsmanship. The trim inside each square is stunning. I also love the paint colors you chose and your light fixture. Lilacs are always a beautiful touch! Enjoy your new dining room.
Beautifully done! The company is a gem! They did such a very nice and classy job. Lucky you!
Absolutely beautiful! Classy, yet comfortable and welcoming.
We all agree, the skilled craftsmen have done a beautiful job on this addition to your room! I look forward to seeing more of your beautiful room. Enjoy your new room.
I love it! Can you tell me what your budget was for the wainscoting?
Hi Bonnie,
I’m not sure of the breakdown but I’ll figure it out and include the cost in my final wrap-up post. Thank you!
Everything looks fabulous.They did a beautiful job with
all the detailing.You found a gem in these carpenters.
Can’t wait to see the end result.
I love the changes in your dining room. Your carpenters are real craftsmen, their work is beautiful!
A beautiful job well done. You are so lucky to have found such wonderful craftsmen and ones who were willing to offer input during construction from you. Your room looks fresh and beautifully put together.
They did a beautiful job Ann! I am installing a board and batten design to my bathroom right now and mitering those little pieces of trim, caulking, filling nail holes, and painting it all to perfection is a lot of work. your carpenters are very talented. It looks fantastic!
I loved your “old” dining room…especially the wallpaper but the beauty of this new space is in the percision workmanship.
Every item you place in that room, from furniture to table top will stand out against this beautiful backdrop.
It turned out just beautiful! I have a question for you. How did you determine the height of your wainscoting? Yours looks quite high up the wall. Is there a rule to go by for determining the height? Thank you.
Hi Claire…I don’t think there is a rule. I usually don’t follow them anyway! What I did was match the height of the wainscoting to the center line of the windows. You can see what I mean in the first picture at the beginning of the post. I thought it was the best choice because as your eye travels around the room there is one, level line. I will edit my post to add this info. Thank you!
Beautiful. Your carpenters did amazing work!
This looks amazing, Ann! So happy for you.
Beautiful, gorgeous, amazing, classy….and any other word to describe spectacular!! Wondering how it would look in my 1880’s farmhouse dining room!! ???? You have such a great talent in design and decorating. Care to make a trip to Wisconsin?!?
Well done!
LOVE THE LOOK!!!
Absolutely beautiful. I love it.
I love this and can hear the excitement in your words. Nothing like a little remodeling to lift our spirits. Plus….the weather has been an added plus here in MI.
Absolutely gorgeous wainscoting! It’s obvious your construction guys are real professionals!
You made really great choices. It turned out beautifully! Can’t wait to see more!
Beautiful, Ann!
Adding the molding did add the extra touch. The workmanship is beautiful and It was worth every penny in your renovation. Your dining room set is a perfect fit too.
Kathleen in Az
It’s absolutely beautiful. I love the extra trim. It really is the perfect finishing touch. Thanks for sharing.
Wow!! What a difference board and batten can make. I love it and the detailed trip is the icing on the cake…great choice! I cannot wait to see the finished room. Your house is beautiful, so I know the dining room is going to make a big statement! Great job Ann!!
Wow, your dining room is amazing! The new board and batten wainscoting is gorgeous and really makes such a difference in the room! Simply gorgeous elegance!
I guess saying that I want to copy your dining room remodel tells you what I think. Lovely! The moulding detail really looks gorgeous!
Gorgeous…I’m so jealous!
I love it Anne ~
You are so right I love the molding in between the squares.
Just lovely.
Have a wonderful day.
Much love,
Rose
I love your new Board and Batten in your dining room. I’ve been wanting to to this look in my entry way and now I have the inspiration for how I would like mine to look.
I love everything you do. Your taste is very similar to mine, although I have a very small condo and can’t do most of what you do. I can dream though! Thanks for always sharing!
Absolutely stunning! What a tremendous amount of work. I think it definitely is best left to the professionals. I can hardly wait for the full reveal. Thank you also for your detailed explanation of the process.
I really like the look and also the step by step pictures on the process. Great Job. Looks beautiful.
It turned out beautiful Ann!
Beautiful!!! Thanks so much for sharing.
Your board and batten is gorgeous! You were so fortunate to find such excellent carpenters. They are truly artisans. I’m looking forward to the full reveal of your dining room.
Loving it, Ann!!! Please be sure you post the before pics when you do your final post. I can’t recall how it looked. Happy for you.
Your dining room looks stunning, Ann, and I love your neighbors’ white lilacs!
It all looks beautiful! Wonderful job in choosing and wonderful job by your carpenters! Congratulations,now enjoy!
Oh my goodness, what beautiful work they did! But it all began with the idea you had in mind, so kudos to you, Ann. Love the color combination….soft and fresh and so inspiring. Look forward to the final reveal and by the way, I have a couple of small white lilac plants and if you were closer I’d give you one! How lovely they look on your table.
Lovely..very classic looking…your floors are very nice..love the colour of them..????
You must be so pleased with the results. This is quality workmanship and the end product is stunning.
Beautiful
Love love the finished look. You (and the guys) did an absolutely beautiful job. You have added a period style to your home and it . I love the classic look. Can’t wait to see your window treatments. That’s where I seem to get stuck when I do project a are the window treatments. I know . It feels good to have something finished.
Beautiful! Skilled, dedicated craftsmen are hard to find.
Waiting for your next post!
PS my mind can smell the lilacs
Your careful research paid off and you were blessed to find skilled craftsmen. I am so happy for you; it looks refined and classic. A perfect fit for you.