
Wreath making is easy with the right inspiration. See how to make a beautiful fall wreath from basic craft store supplies, and save a ton of money!

For as long as I can remember, I’ve loved wreaths. They’ve always played a big role in my decorating style…whether it was in our first home or where we live now. There’s just something so welcoming about a wreath on the front door. It sets the tone for what’s inside and instantly makes a home feel warm and inviting. Over the years, I’ve made and shared so many wreaths here on the blog that I’ve honestly lost count. No matter the season, a wreath is one of the easiest ways to update your space and add a personal touch.

This post may contain affiliate links. See my disclosure statement.
Finding Inspiration
Over the years, I’ve picked up helpful tips that have made DIY wreath making both simple and enjoyable. While the process itself is easy to learn, sometimes the hardest part is finding inspiration. That’s why I always try to keep an open mind and pay attention to wreaths I see online or in stores. For this tutorial, my inspiration came from a beautiful wreath I spotted at Pottery Barn. I loved its wispy design and the slightly unbalanced shape, which gives it a natural, relaxed feel. It’s the kind of wreath that works from early fall all the way through Thanksgiving. What I didn’t love was the $149 price tag…definitely not in my budget for seasonal door decor. So I took a closer look, studied how it was put together, and realized it was something I could recreate. My version isn’t an exact match, but it’s close—and just as charming. When you’re working from inspiration, substitutions are part of the process, so don’t be afraid to get creative and think outside the box.

Supplies Needed
- grapevine wreath form
- faux leaves
- ivory spray paint
- pumpkin picks
- berries
- cotton boll stems
- glue gun and glue sticks
- I chose not to add any lights, but these fairy lights from Amazon would be a good choice

Assembly
- In a well-ventilated space, lay the faux leaves on a piece of cardboard. Apply the spray paint. Let dry.
- Place the grapevine wreath on a flat surface.
- Place some wispy sticks into the sides of the wreath. This adds dimension and depth, but is totally optional.
- Randomly insert the pumpkin picks into the bottom of the grapevine wreath. Make sure they are secure.
- Place the leaves on the wreath, under and around the pumpkins. Trail a few leaves up the right side of the wreath. This is a “dry fit,” so move them around until you like the placement. (Pictured above.)

- Once the leaves are in place, carefully glue them to the wreath with hot glue. Lift off each leaf, and using a hot glue gun, add a bit of glue to the back, and place it on the wreath. Use a spoon or popsicle stick to press the leaf onto the wreath. (Don’t use your fingers!)
- Once the leaves are in place, add the embellishments.
- Carefully insert the berries, cotton boll stems, or other faux elements in and around the leaves.
- Make a hanger from twine or floral wire, and attach it to the back of the wreath.
- Hang and enjoy!

Variations and Substitutions
This design can easily be adapted for Christmas by starting with a pine wreath, either real or faux, instead of a grapevine base. Swap the fall leaves for spray painted poinsettia blooms or magnolia leaves, and use painted pine cones in place of pumpkins. One noticeable difference between my version and the inspiration wreath is the size. The original is a full 24 inches wide, while mine measures 18 inches. To help fill it out, I added wispy sticks and arranged some of the leaves so they extend beyond the wreath’s edge. These small touches helped create a similar look, even on a smaller scale.

Keep in mind that you can basically use anything that can be spray painted. Some ideas are faux eucalyptus, faux rosemary, dried flowers, faux sunflowers, and different types of greenery.

Finishing the Space
After I placed this new wreath on our door, I decided our porch planters needed a small update. I replaced the mums from my fall front porch refresh with large off-white faux pumpkins. I simply placed the pumpkins on the potting soil, and then wrapped the existing ivy around the pumpkins to secure them in place. This look can also be achieved by using very large real pumpkins.

Use What You Have
Before starting any craft project, take a few minutes to look through your current supplies. You might be surprised at what you already have on hand. When using an inspiration picture, don’t feel like you need to match every element exactly…substitute with similar items from your stash. For this wreath, I was able to save money by using a wreath base, cotton boll stems, and ivory spray paint I already had. I also repurposed some white berries by giving them a quick coat of the same ivory paint used on the leaves. The only things I needed to buy were the faux leaves and pumpkin picks, bringing the total cost to just $15.

Wreath Hanging Tip
If you don’t want to use a traditional wreath hanger, Command hooks work well. Make sure to get one that holds at least 5 lbs. and follow the directions carefully!
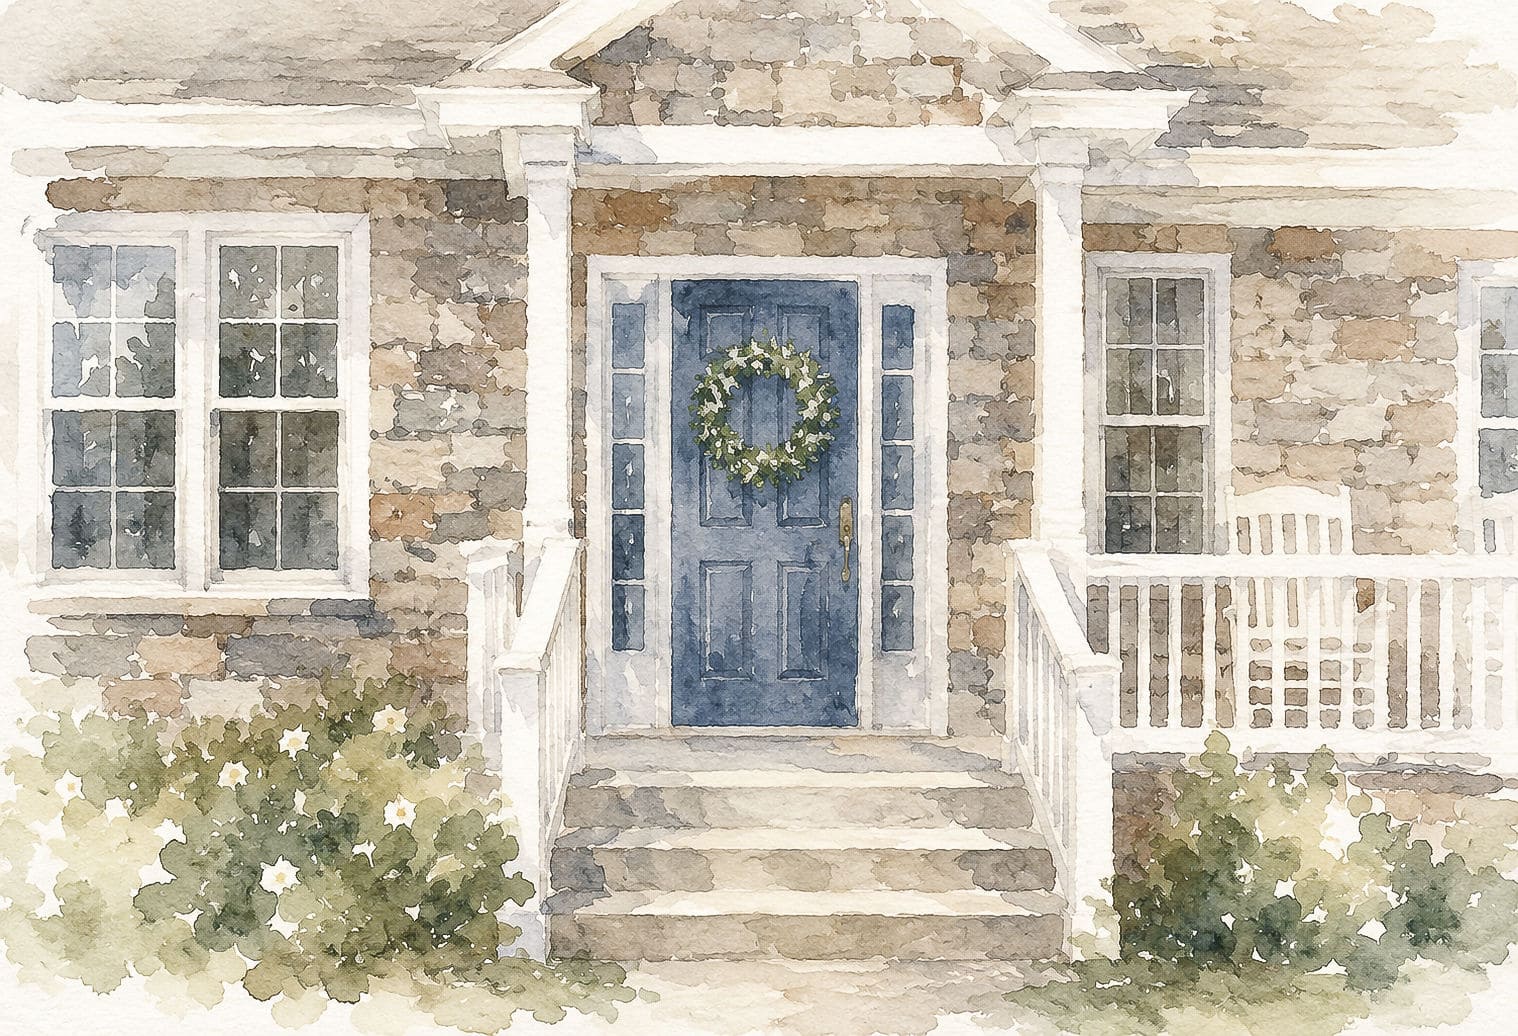
This wreath ended up being the perfect finishing touch for my fall porch. The soft ivory tones pop beautifully against the blue door, and the overall look feels warm and welcoming. It’s simple, budget-friendly, and most of all, it reflects my style. If you’ve been thinking about making a wreath but weren’t sure where to start, I hope this inspires you to give it a try. With a little creativity and a few basic supplies, it’s easy to create something you’ll love.

JOIN THE OSP COMMUNITY
Sign up to get uncomplicated recipes, unlimited seasonal decor, and
understated ways to refresh your home sent straight to your email inbox!


The Ultimate Guide To
Celebrating Fall
A collection of 100 autumn decor ideas, fun crafts, fall wreaths, and yummy recipes all in one place. It’s the ultimate guide to fall, and provides easy links to find exactly what you are looking for!
Just lovely, thank you. I have not thought of spray painting the leaves
I love the wreath. I do want to comment about a movie you mentioned that you were going to watch entitled Love Sarah. I started but did not finish. Anytime a movie takes God’s name in vain is no brainer for me not to watch. I am glad I have control of at least that part of my life.
I like your wreath better than the PB one❤️. Very pretty.❤️
BTW: your wreath is much nicer than the Pottery Barn one
Such a perfect Fall wreath to welcome friends to your home. I hope I can follow your lead and create one just as lovely. Thanks Ann. Another inspiring email.
Ann, your wreath is beautiful. The pumpkins and ivy look so pretty in your planters by your door! You always do such a beautiful job of decorating your porch.
I love your wreath. I plan to make one similar. I also appreciate your annual calendar. I have printed full size months for my wall at work. I also print a full set using “Statement “ size on my printer. This (with a little trimming) fits in my daytimer. Such beautiful artwork that I fully appreciate. Thank you
Ann, this wreath is just stunning! Great job!!
The Pottery Barn wreath is very pretty but way out of budget.You did a great job with your version.I love the cream and white, the wispy pieces give it a natural look.
Love all your wreath ideas!!! Easy to follow instructions too:)
I LOVE your version. It’s stunning. I like the price, too! Always enjoy looking at PB and other shops, but have never had the $ to purchase their lovely things, Thanks for giving beautiful alternatives.
Beautiful wreath! I,too, always have a wreath on my front door(even if the birds make their nest in it!)
Your porch looks great! What a good job you did replicating that wreath.
I think your wreath is more beautiful than the PB wreath you used for inspiration. Guess I will be making one more wreath for Fall! Have a wonderful week.
Love your use of all white on your fall,wreath,and it looks so lovely against your blue door. I have been making my own wreaths after going to a workshop for making an herbal wreath many years ago. So relaxing and also budget friendly. I always am on the lookout for good quality wreath making material when thrift store shopping. Thankyou for all your ideas.
This is so eye-catching and beautiful! Thank you for sharing how to make it. Love it!
Ann,
Love the wreath! Wondering if you might share the hook used to hang it?
Thanks, it’s been a struggle for me to find the right one.
Hi Sheila! It’s a Command hook. Here is the affiliate link: https://amzn.to/3CF6DAf. I couldn’t find one that held more than 5 lbs. but so far so good! I also added a little section to the post with the information. Thanks so much!
wreaths are always very beautiful and the tutorial is the best. thanks for sharing the ideas
I am very interrested in your site and especially wreaths …
I love wreaths and yours are beautiful. Every time I make a new one my husband asks, “Where are we going to store it?” But I love changing them out for the seasons and holidays. Love the tutorial and the inspiration.
Thanks Anne, i pray you are having a restful weekend.
thank you for sharing this information!