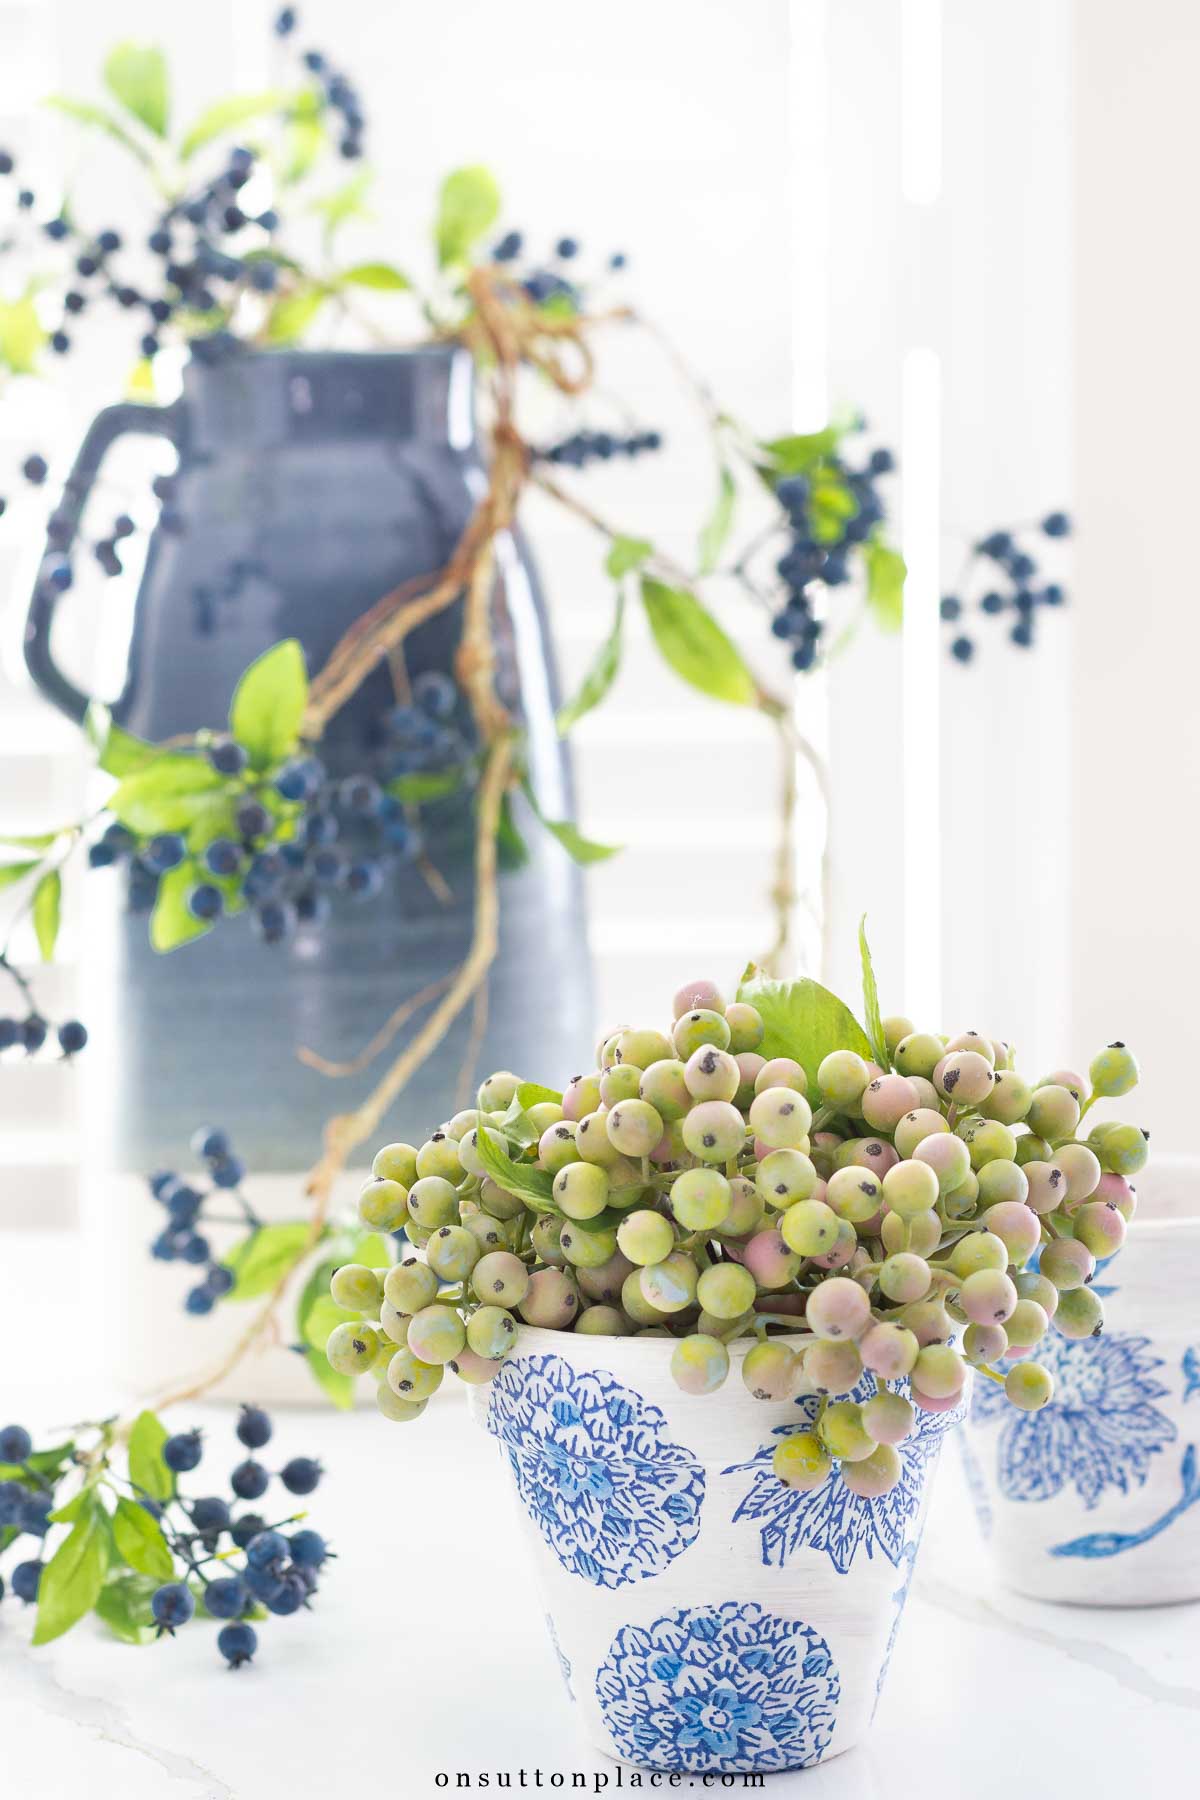
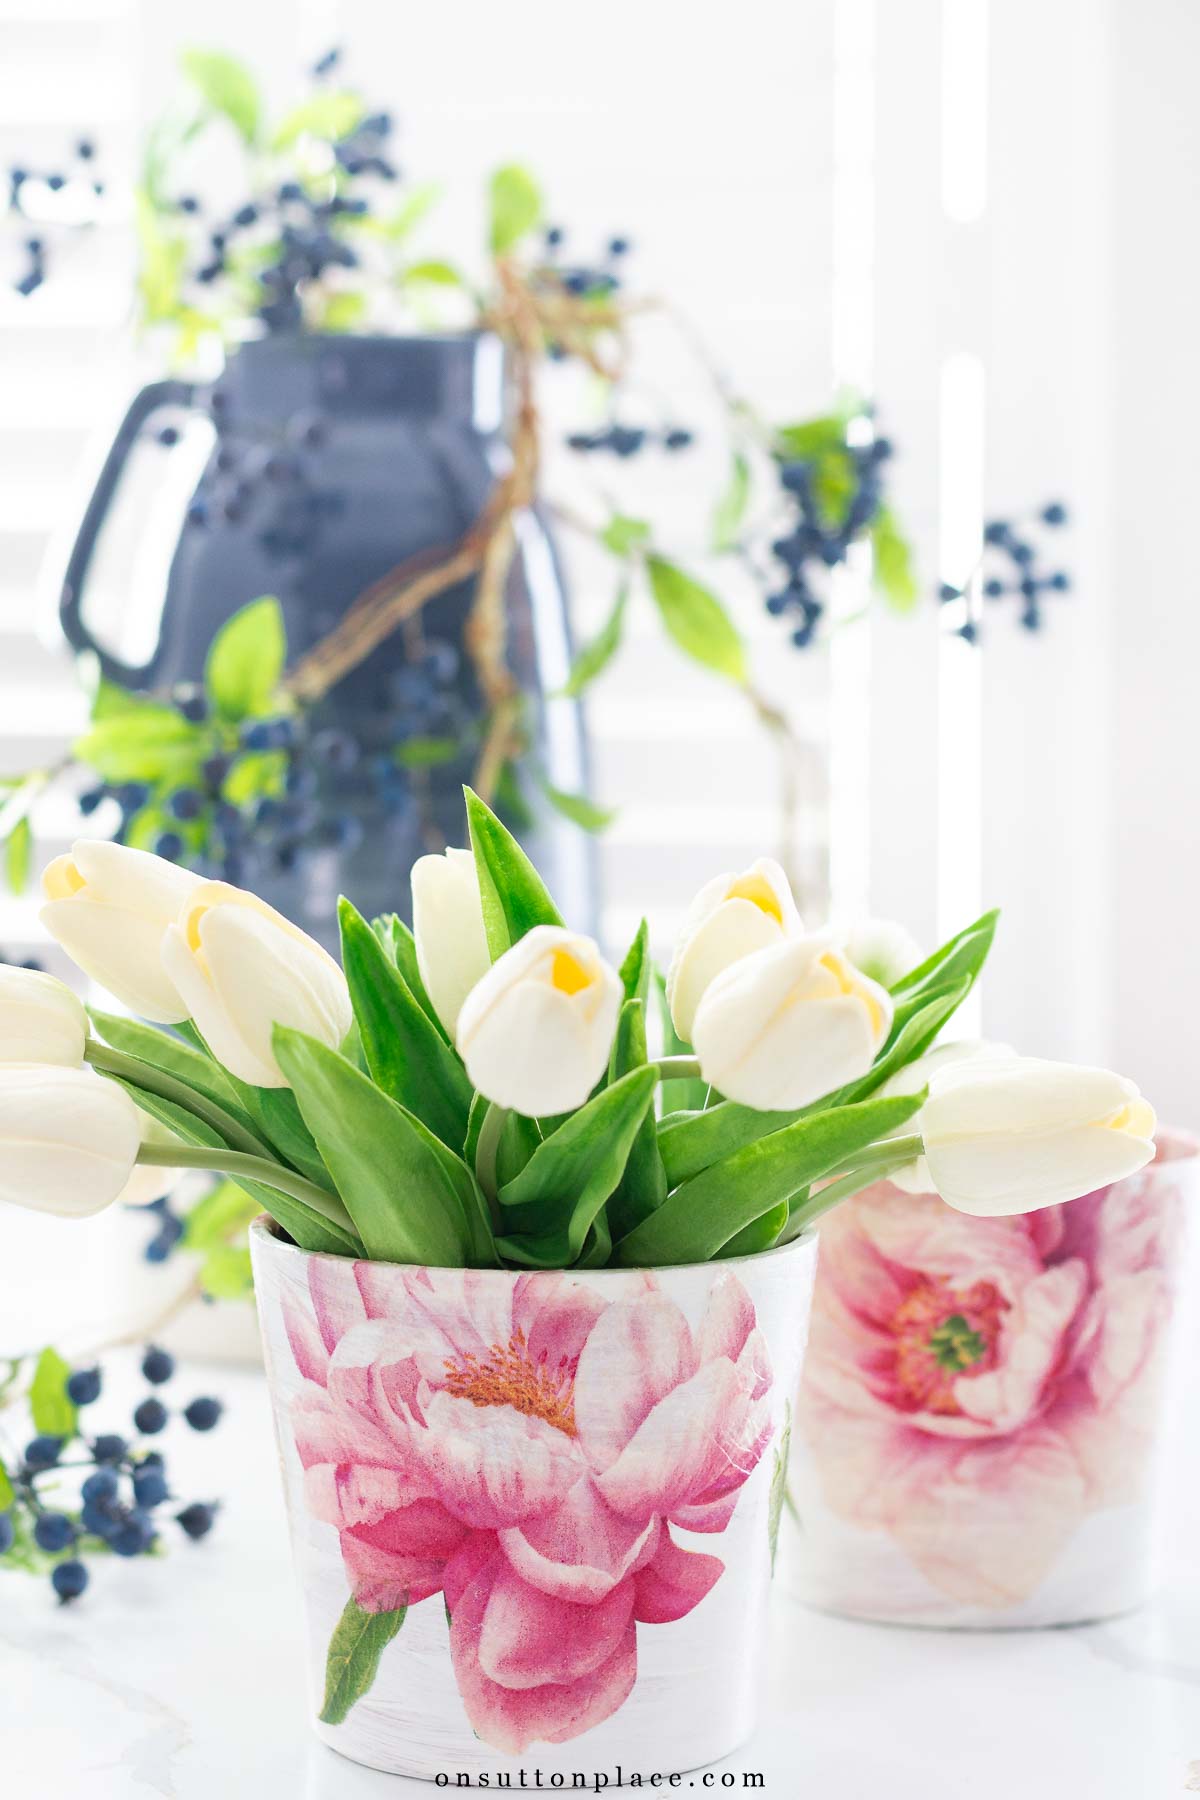
Turn plain terra cotta pots into charming planters with this easy Mod Podge DIY. Perfect for gifts, faux greenery, or seasonal decorating.

If you’ve ever wanted to personalize a simple terra cotta pot, this easy project is a fun place to start. With just a few supplies and a little time, you can turn basic pots into something truly special. These Mod Podge pots are perfect for gifting, or to use around your own home for faux greenery or flowers.
This post may contain affiliate links. See my disclosure statement.
What is Mod Podge?
Mod Podge is a decoupage medium that truly does it all. It acts as a glue, a sealer, and a protective finish, all in one easy-to-use product. It’s most often used to adhere paper or fabric to a wide variety of surfaces, including wood, glass, and terra cotta. There are several formulas available, but I always reach for the matte finish. It goes on smoothly, dries clear, and gives just the right amount of texture without any shine.

Does Mod Podge Dry Clear?
The answer to that question is a definite YES. That’s the beauty of the product. It’s goes on white, but in just a few minutes, it dries to a clear and very hard finish.

Supplies Needed
- 4 inch terra cotta pots
- set of cylinder terra cotta pots
- paper napkins: blue & white | pink peonies
- Mod Podge (matte finish)
- paint
- foam brushes
- faux rosemary

How to Make Mod Podge Terra Cotta Pots
Step 1: It’s a personal choice whether or not to paint your pots. If you like the terra cotta finish, by all means leave them unpainted. I wanted a soft white finish, so I painted mine with one quick coat of chalk paint. Make sure to let the pots dry completely before proceeding.

Step 2: Unfold several napkins and separate the layers. Most napkins are either 2-ply or 3-ply. For this project, you want the top layer only.

Step 3: Cut out designs from the napkins. Sharp scissors with a pointed end make the job much easier. Get my favorite scissors HERE.
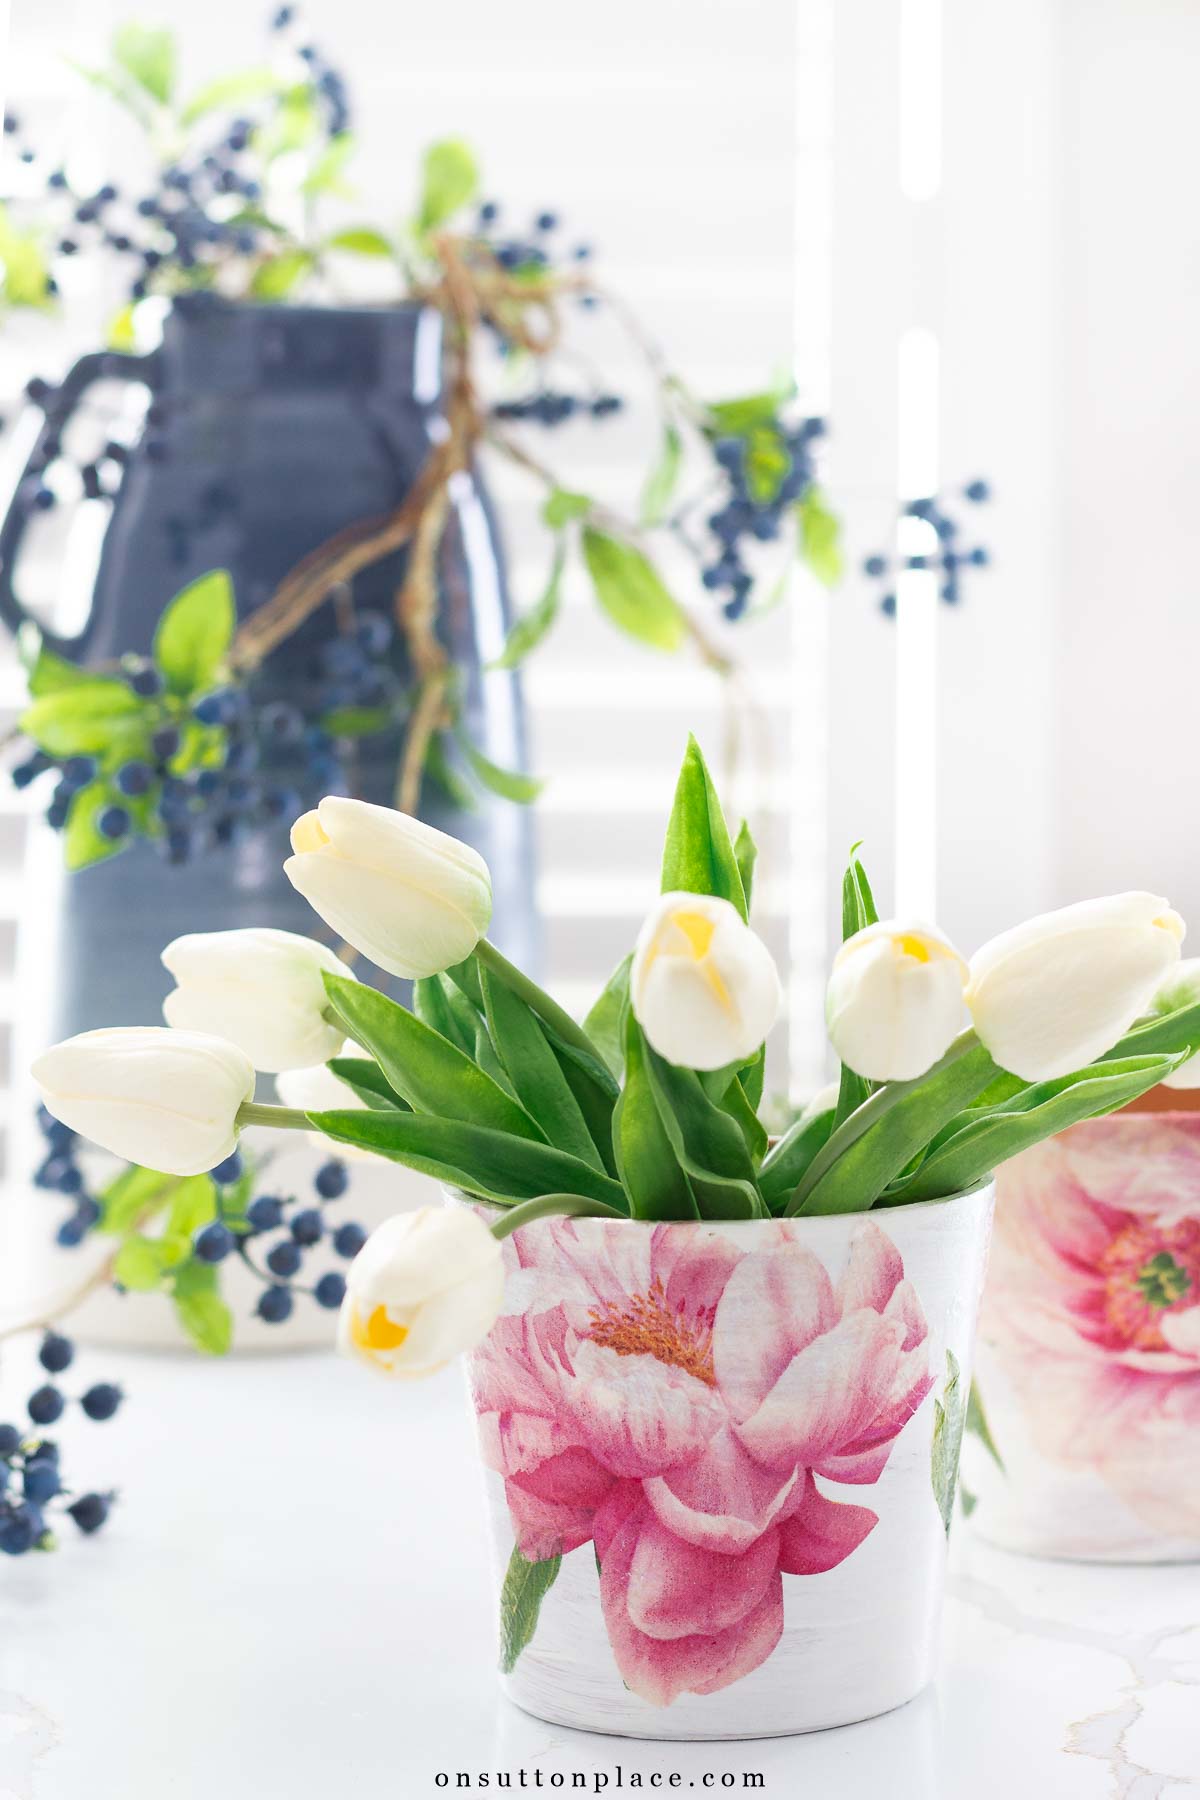
Step 4: Pour some Mod Podge into a throw-away container. Brush the medium onto a section of a pot. Carefully apply a napkin piece and gently adhere it to the layer of Mod Podge. Smooth it out with the foam brush, covering it completely with more Mod Podge. Continue around the pot until the design is complete.

Step 5: Let the pot(s) dry completely, at least an hour. When dry, finish each pot with a final layer of Mod Podge. TIP: These pots are not water-proof. If you fill them with potting soil and real plants, they must be prepared first. I heard from a reader who said she applied polycrylic spray to both the outside and inside of her finished pots. She planted herbs, and said the pots are holding up very well. Get Minwax Polycrylic Spray {HERE.}

Taking Time for Ourselves
If you’ve made it to the end, I’m guessing this little craft caught your eye. But if you’ve been thinking, “I don’t have time for this,” I completely understand. There was a season in my life when every minute was spent caring for my family or focusing on work. I didn’t carve out any time for myself, and that went on for years. Looking back, I wish I had made more space for the things I enjoyed. I truly believe I would have been a little easier to live with, and definitely a whole lot happier.
So go ahead…pick up a few terra cotta pots, some pretty napkins, and a bottle of Mod Podge. Spend an evening cutting out your napkin designs while you catch up on a favorite show, then set aside an hour to put everything together. Whether you keep the finished pots or gift them to someone special, I promise you’ll feel more relaxed, a little lighter, and ready to take on what’s next.
And just one more thought before I go: taking time for yourself isn’t selfish or indulgent. It’s necessary. If it’s been a while, plan a craft session, schedule that manicure, or meet a friend for lunch. You’ve earned it.
More Mod Podge Craft Ideas
Mod Podge Pots
Want to print this tutorial?
Just fill out this form and an
easy-to-download PDF will
arrive straight to your inbox!

These are beautiful Ann. I wondered about the size of your pot and the plants you put in them. Thanks for sharing and have a blessed day.
Hi Liz…all the items I used to make the pots are listed in the post. (They are links so you can see what they look like.) The pots are about 4 inches tall. Enjoy!
Thank you Ann. Which plants did you put in the pots. They look amazing I think you said they were faux plants.
These are gorgeous! I will have to see if I have any pots laying around, I know I have some pretty napkins I can use. Thanks for the suggestion and ideas here.
@tisonlyme143
Hi first I love your pots and I will try making them myself. I was wondering if you can also use like plastic pots with these products? Thank you tracy
Hi Tracy! Yes, you can absolutely use plastic pots. Mod Podge sticks to literally anything. Have fun!
I can relate so well to your comments regarding going back in time and taking time for myself. I’d have been a much happier person.
As an aside, your mod podge craft is right up my alley. It’s fun and relaxing. Plus, people like receiving these items as gifts.💕
Such cute little pots! Ann, have you used Mod Podge over white paint before without it yellowing over time? I made lap desks for 3 nieces and my 2 daughters about 15 years ago. Hours and hours of sanding, painting and placing stickers with their names and hobbies across the top just to have them all yellow within 3-5 years. I was heartbroken! (At the time, 2 were in AR and 3 in different parts of TX… for climate context.) I love Mod Podge but have been hesitant to use it ever since.
Careful what chemical spray you use to seal the pot when planting herbs or anything you will eat.
Hello! I would like to show you my pots, but it’s impossible to send any photos. I really love this craft, I’ve made 15 pots.
Hi Ana! You can email me your photos to ann@onsuttonplace.com. I would love to see them. Thank you!
I miss crafting so much! I’ve been thinking this is something I wanted to do, so why not now! Thanks for this post. Yours turned out really nice!
These pots turned out adorable! I love the patterns you chose! I’m so happy that I came across your blog! I was going through my analytics and came across a referral source “These Peas Taste Funny”…a blog I used to love and follow waaaaay back in the day! I went to Terry’s blog (that is no longer being added to) and found some posts with links to my blog. Long story short, I found your blog also linked to some of the old posts that mine were linked to! Love that we’ve both been blogging for a looong time!
You have so many amazing and wonderful ideas! So happy to be following along now!
I will take any excuse to go into Tuesday Morning! I actually Mod Podge oyster and crab shells and make trinket holders and crosses out of them!
These are SO pretty! I’m inspired to try it!
Oh Ann, what a lovely idea for Christmas to serve as house gifts, remembrances to friends, etc. I’ve ordered my pots, mod podge and poinsettia napkins to get a head start so I won’t feel rushed. I’m debating between filling them with cookies or planting princess pine in them. Heck, I may do some of both! Thanks for the scissor recommendation as well!
“You’ve earned it.” Ann, you are spot on. So many times people, women in general, put everyone else first. Not that I want to become a me, me, me person. Taking time to take care of yourself is the best thing for ALL your family and friends. You will be the better human being for it.
Hello!
I’m doing it with old boxes to store things. I wish I could send you some pictures! They look marvellous!😍
If used for real plants, yes, you definitely must seal the pot inside and out. Michael’s Crafts sells a sealer specifically for terra cotta. Works great.
You described me to a T;!! You write beautiful I don’t know how old this post is but I hope you have continued writing.❤️
What do you do on the inside? Last time I dis this it all starter coming off when the plants are watered. The teracotta absorbs water….
Hi Liz…it’s best to use faux greenery. It may work to apply a waterproof sealer to the inside of the pots, but I have never tried it.
I saw in the comments that one of my readers applied polycrylic spray to her finished pots. She sprayed on the inside and outside. It’s made by Minwax and I added a link to the post. I hope this helps!
These are SO pretty! Thank you !
Can’t you just use the entire napkin instead of cutting out each flower? Yours are gorgeous! I love the Christmas holly ones too! Linda
Do you have to use chalk paint or will acrylic work also?
Hi Bonnie…any kind of paint will work. Use whatever you have on hand. Enjoy!
I made these and I’m very pleased with the results! Thank you. You inspire me. 💕
Wish I could figure out how to send you a photo.
Have you ever had the modge podge get sticky afterPutting soil in and planting/watering the pot?
Hi Molly…I haven’t tried using a real plant. The greenery in the photos is all faux. I think the inside of the pots would need to be sealed in some way so the water can’t soak through. You could also use some other sort of pot, not terra cotta. I hope this helps!
Your clay pots are beautiful !! You certainly have inspired me to make these pots ! Thank you very much for the tutorial.
Have a wonderful week👏👏🤗💕
Ann, I just went to Tuesday Morning today and got some beautiful flower print napkins. I can’t wait to pretty up some of those pots!! Thank you for showing how to do it.
Enjoyed your project. Decoupage can be very relaxing as it’s not “rocket science”! You are so right about taking time for yourself. When my daughter was a teenager, she informed me that she needed chauffeur service on a weekend night. I replied, “Sorry, I have a date.” She said, “But Mama, you’re not supposed to have a life.” The egocentricity of our children! A woman can only create so many children; in Maine, only garden for a small part of the year. Crafting, sewing, cooking fills the hole in my soul that needs to create and can be done at any time. Now that I’m retired, I try to do something creative or self-caring every day!
These are adorable. I could make some for every holiday and special occasion! For those asking about sealing or waterproofing them… Mod Podge makes a spray matte clear acrylic sealer. It sold right next to the Mod Podge at Walmart.
So pretty. And easy-peasy! These pots would make such great gifts for Easter or a friend’s birthday and many other occasions. Something handmade, even if this simple, is always especially appreciated, I think. Thanks for the tutorial!
These are beautiful Ann!! I will be making some for our home. Thanks for sharing.
Hi thx for sharing your Rosemary uses with Pinterest! I’m going to try several as I have two huge bushes that need trimming! I just read the Terra cot mod pudge project. Looks so easy and fun use of beautiful paper napkins! Have you used mod podge with fabric too? I’m thinking of doing some shadow boxes etc using old vintage tea towels that belonged to my great, great great Aunt and Grandmother. Some of these are from the 1930’s -50’s. I think I’ll practice with a rag type towel first then if successful I’ll move forward.
Thx again!
Many blessings,
Jennifer S
You are so right my friend!
Thank you, Ann, I need to take your advice. And this craft looks so fun!
Ann,
So pretty, fairly easy and fun to do. Can’t wait to get my supplies. Thanks for posting.
I LOVE this Ann!!! So on trend right now!! Definitely making these!! 🌷
Thanks for sharing!!
The pots are beautiful Ann. thank you for sharing such a wonderful craft idea. I love the pretty prints on cocktail napkins, so I look forward to trying this project.
Love this Ann! Love your blog! Yes, taking time for yourself is NOT SELFISH! I will mod podge some of my clay pots soon! I also love crafts. My Mom (who grew up in the 1940’s) did crafts with her sisters. In their day there was only radio. So that’s what they used to do! I always look forward to reading blogs like yours! I find it very grounding!
You can also do this on the BACKSIDE of clear plates. Use them as chargers or dessert plates but hand wash. Did some in the 70’s and I kept them 8 yrs and then I changed my style and gave them to my neighbor, she used them for years, too. Just hand wash.
Thank you for the suggestion of using clear glass plates. I have a stack that needs some refreshing images.
How well do these last with watering plants and it soaking into the terra cotta? Do you know? I don’t know if mod podge is waterproof. If not I guess they would be great for succulents. These are so lovely. Love your message too. I agree!
Hi Mimi, Mod Podge is not waterproof. If you can find some sort of liner to put in the pot, then I think it would work to use a live plant. There is a Mod Podge that is water resistant, but it doesn’t say that it’s waterproof. I used faux greenery to fill the pots in this post. I hope this helps!
I had no idea that greenery wasn’t real! Makes sense though. I just love these and need to make some Thanks for the response.
I sealed mine with polycrylic spray so i can plant herbs. I sealed the outside once the modge podge was completely dry…2 days to make sure. I also sprayed the inside. They have a beautiful glossy finish as if they were glazed. Mine have been outside all spring and summer and are really holding up.
Thank you Roxanne! I may give these a try!
I agree with your philosophy of taking time for yourself. I can’t believe that is so hard for us to do. I’m really trying to change that for myself this year.
What a simple and cute idea! Perfect for Mother’s Day or a girlfriend gift. They would also make such a pretty table setting with the napkins to match. …and your advice about making time is spot on Ann!❤️
These are lovely! Easy and relaxing projects are fun. The stores should have lots of pretty napkins for Spring and Easter right now. I have some pretty Fall and Christmas designs in my stash, too.
These turned out great. I think I don’t leave enough white space when I do these decoupage projects. I’ve done Easter eggs in the past and last year did pumpkins. I intended to try some Christmas ornaments and didn’t get to that last year. I get my napkins at Tuesday Mornings. Do you have a good source? I can never find exactly what I’m looking for.
I find my nice paper napkins at upscale local card and gift stores.
Thanks for responding!
Hi Teddee, I included Amazon links in the post for the napkins I used. There is a huge selection and I’m sure you can find something you like!
Thanks for the links!
Ann, these pots are so cute! I will definitely be making some! Thanks, so much, for sharing this craft with us! We appreciate you!
Love these! Love your message also ♡
These are so beautiful and such a great idea! I can’t wait to try these this Spring!
Your pots turned out so pretty, Ann! Many years ago, I covered pots with fabric and used white glue. Mod Podge gives a more durable finish, though.
Thank you Ann. You are right, this project has been around for years. I thank you for giving it your beautiful style. I appreciate your words of wisdom. We need reminder of this from time to time.
I need try this, I have some beautiful napkins that would be beautiful on a pot!
I did this for my mom for Mother’s Day a few years back and gave it to her with her favorite flowering plant in it. Turned out beautiful & she loved it. I love your choice of patterns!
So pretty Anne!
Morn Ann~ Love this craft idea and will make an attempt at this as I’m already thinking giving as a small gift for First Day of Spring(!), Easter, Mother’s Day and the list goes on. Your honest self-reflection made me smile in ways. Married and childless my working years were pretty much devoted to ‘the job.’ You know that quote something to the effect of “when on my death bed, I won’t be wishing I spent more time at the office”…. that will be me. And when flying and the flight attendant asks parents with children to place their mask on themselves first, there’s a reason for this, and we all need to remember that…….
The pots are adorable and an easy craft.I agree, we all need time to ourselves.
Wow, these turned out so pretty!
Love this Ann! Love all that you post! Great advice too, women don’t take the time for ourselves and we need to. For if we are happy and healthy, we can be our best for others!
I am so glad you took the time to talk about taking time for yourself. I think if more women did this regularly, the rest of the time would be so much better for them and their families. Good for you!!! Oh yes, loved the pots!
What a great craft project, Ann! I love to craft but haven’t taken the time to plan a craft project. These would make a great hostess gift gift with a plant inside. Better get my mod podge out of the closet! Thanks for the inspiration. 😊
I love this project! I totally agree with the statement of taking time for yourself. The pots are lovely and will definitely try making some for myself and friends. Thank you Jean
I have done this with varying size eggs. They look pretty in the nests I bring out for spring. I also tuck them in my table display that I change with the seasons.
Ann, Havent done a mod podge project in years. I used really pretty floral print napkins to cover the back of clear salad plates and only used the glue on the back so they could still be used to eat off at a spring tea party our herb group held. Fun to make and will definitely try the little pots.
Ann, I will be buying pots today! I have done this technique with Easter eggs and it is so much fun! Another great source for quality napkins is Tuesday Morning. I love your blog…thanks for all your inspiration.
Love this! I just bought all the needed supplies—thanks for the links!
Me time is so important, how often I forget this.
I have been a crafter forever, but have never tried doing anything with Mod Podge. Now I just have to make some of these flower pots! Thanks for the inspirational ideas Ann – and I love that you include sources.
Thanks for a lovely project, Ann! Thanks too for the reminder to spend some time dong things we love to do just because it makes us happy. You are wise, and I know I needed that reminder today.
Ann, what a lovely post this morning!! I have seen MANY modge podge crafts… as well as ones involving terra cotta pots, but these peonies really caught my eye!! I love peonies and flowers in general. Thank-you for the link as well. They will make nice Easter gifts… or anytime gifts for the Spring /Summer!!! 😊
This is a very pretty craft project. Being that clay is porous, I am assuming these pots are filled with faux plants. Or, do you waterproof the inside of the pot?
Thank you!
Hi Nancy,
I have read from a You Tube site, ‘Upcycle with Decoupage’… she suggestes how to completely waterproof outdoororoof her pots using a ” Spar” varnish. It’s actually made for boats so it also provides UV protection as well as other types of outdoor protrction. Granted, this is if you were to keep your pots outdoors. But while in not an expert, I’m left with the feeling you could keep live plants in them as well?? Perhaps you could ask her?? In all of My reading, I’ve yet to come across an answer. However, I also know of another product, and this MAY answer your question. Krylon Crystal Clear… You can find on Amazon. The former product requires a tedious process, while this is a spray on. Good luck… Perhaps you could try with an inexpensive plant you don’t care about ( is there such a thing… (🤔😢😊)
Hi Nancy…yes, the pots are filled with faux greenery. If you used a pot liner, I think it would be OK to use live plants. I wouldn’t do it in the basic terra cotta. I hope this helps!
My finished pot is on Pinterest. Thank you for showing us something that can easily be done, provides a useful end product, and adds beauty to our homes. A few girl friends joined me in the backyard (all the while social distancing) to make our individual pot. The conversation eclipsed the craft and provided a much needed time of fellowship.
This is simply wonderful. Thank you so much for sharing!
What a precious idea. And what a great addition to a kitchen table. Thank you so much for taking the time and effort so share such wonderful easy ideas with us.
GReat great idea. We all could use some “me” time. Crafts are a good way to relax and use our imaginations. And it’s almost spring so this would never a good project.
Thanks Ann for keeping us inspired
I don’t know where the word never came from. This would be a good project for spring