A DIY way to add a touch of vintage charm to your fall porch is to assemble mum planters in olive buckets. Includes photos and instructions, and it’s so easy!
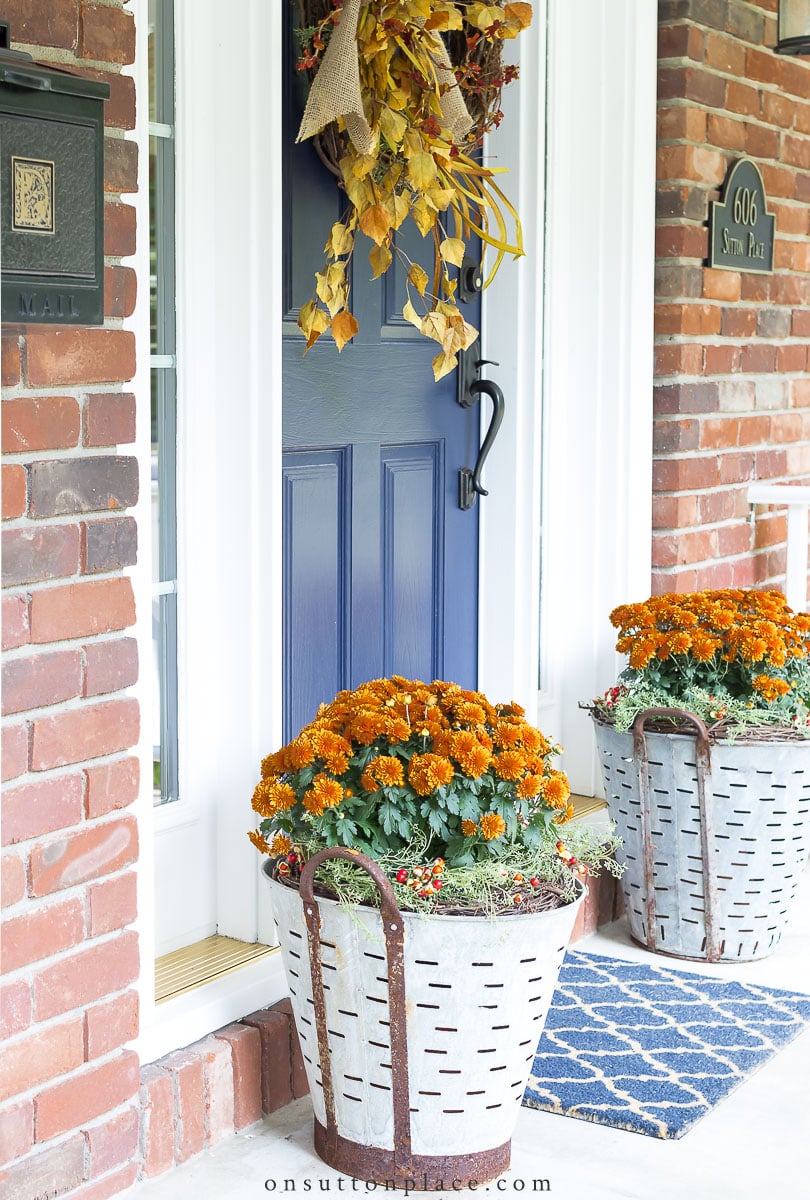
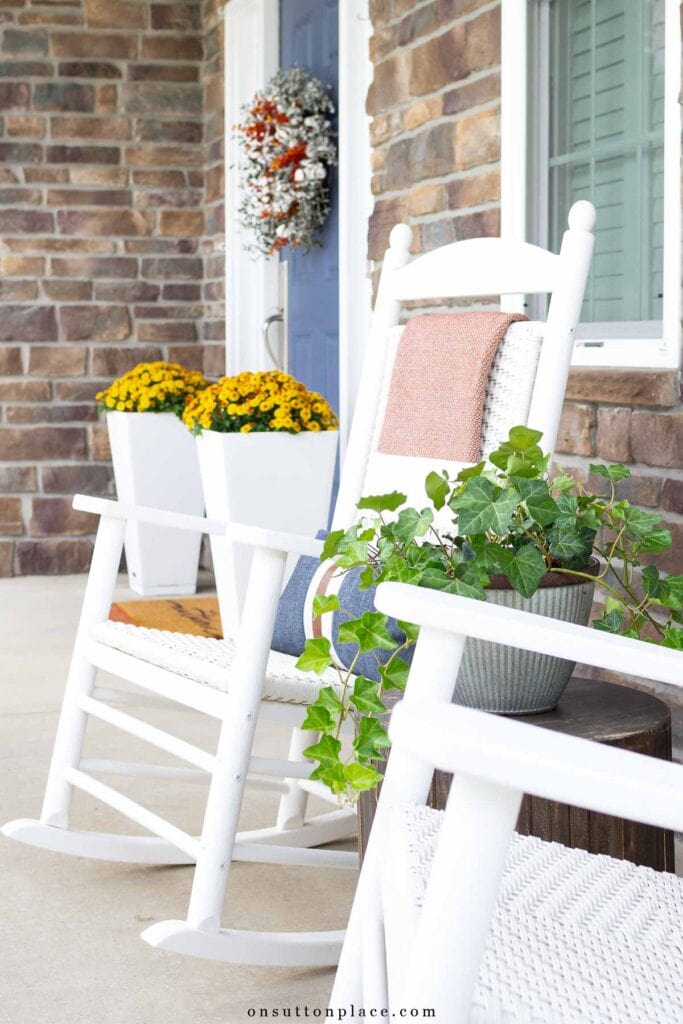
Mums are a classic choice for fall porch decor, and placing them in vintage olive buckets adds instant charm. This easy idea is budget-friendly, takes just minutes to assemble, and works beautifully with other seasonal touches. These fall mums in olive buckets were one of my favorite ways to dress up our front porch.
This post may contain affiliate links. See my disclosure statement.

About the Olive Buckets
Vintage olive buckets can be hard to find. If you live in a large city, they can be found at antique stores, flea markets, and craft fairs. An easy way to obtain them is to do some savvy online shopping. I found my two olive buckets on eBay. I had to pay a hefty amount of shipping, but the day they arrived was so fun! Vintage olive buckets can also be found on Etsy. Unlike the vintage variety, olive bucket reproductions are much easier to find. For an outside planter, reproductions would be perfect. Olive buckets range from 16 inches to 20 inches tall. Mine are about 18 inches tall. My olive buckets do not match, and one is slightly taller than the other. But to me, they are wonderful.

Olive Bucket Sources

Supplies needed for two buckets
- olive buckets (or other similar container)
- pots for inside the olive bucket
- grapevine wreaths
- greenery
- bunches of berries or dried bittersweet
- 2 large mums in a pot

Assembly Steps
- Place any sort of pot inside the olive bucket upside down. I used 8 inch terra cotta pots that I had in the garage. Plastic pots can also be used. These will act a risers to lift the mums over the edge of the olive buckets.
- Place a grapevine wreath just inside the rim of each olive bucket. I totally lucked out with the size of the wreaths that I had on hand. I used 15 inch wreaths, and they fit perfectly inside the tops of the olive buckets. It would be fine for the wreath to sit on top of your container too. It doesn’t have to fit inside. The size of the wreaths depends on the opening of the olive buckets.
- Place your potted mum inside the middle of the wreath, and set it on the upside down pot inside the olive bucket. Place your greenery and berry bunches into the grapevine wreath. You may have to cut the stems apart with wire cutters.
- Stand back and enjoy your beautiful mum planters!

You don’t have to own olive buckets to use this method. It would work with any sort of large pot or planter. I think it would look amazing with terra cotta pots because they are the perfect fall color, and they are very budget-friendly.

Additional Information
- Our front door color.
- The blue doormat is no longer available. This floral doormat is very cute and the same colors, and this geometric doormat would work beautifully too.
- Our mailbox and our address plaque.
- If you’re looking for more ideas, I’ve gathered all my favorite porch displays in one place. Take a look at this collection of 10 Fall Planter Ideas for even more inspiration.


amazon storefront
Discover simple and affordable
ways to refresh your home.
Follow my Amazon Storefront
for all my favorite finds!

This is a beautiful front doorway. Can you please tell me the paint brand and color painted in the door? Thank you!
Very pretty, as usual, Ann. You take the everyday and make it awesome!
Great idea, Anne! I put your idea to work and made two pots! Since I don’t have the lovely olive buckets, I used what pots I already had. And you inspired me to make my own grapevine wreaths from the many wild grape vines that grow in my backyard. Love the look!!!
Anne, So pretty! I love the olive buckets.
Hugs,
Sherry
I love the olive buckets, Anne! I don’t think I have ever seen them. I love your front door updates, thanks for the ideas.
Wow… those olive buckets are amazing Ann. I love how you have dressed then up for the season with the mums, The wreaths are a genius idea too and I look forward to trying that myself.
Hugs ~ Kerryanne
Ann these olive baskets are wonderfull! What a great way to welcome guests and decorate for Fall.
I loved your idea of using the olive buckets plus using the wreaths as fillers. I only have one olive bucket…so I used my plastic urn type planters from summer and sprayed them bronze….used two wreaths, beautiful yellow mums..and this DIY turned out beautiful!
Ann, the mums in the olive buckets are beautiful! I’ve never thought of adding the “embellishments” to them….definitely going to do that to dress them up a bit more! Your porch is gorgeous!
The weather is chilly and its a perfect time to set out mums on the front porch! Love this idea!!!
Very lovely – everything looks wonderful. Thanks for sharing….
Mary
Love how you styled your French olive buckets Ann! And I love the fact they don’t match. Beautiful fall entrance!
How smart to add the grapevine wreaths! Love your olive buckets!
Ann,
Love it! Using the grapevine wreaths – genius! Thanks for the inspiration!
Thank you for inspiring us. It is always a treat to get your email. Thank you for sharing your time and talents with us.
never would have thought to put the grapevine inside the bucket to cover the gap. thanks for the tip!
Ann, you have the best ideas my friend!!! LOVE putting the grapevine wreath on top of the olive basket to fill in the gap! Sharing an pinning!
Hi Ann,
On several occasions I have needed a little extra something to dress up a plant or pot, but never thought to use a grapevine wreath. Very nice touch. Your porch looks great. Love the orange & blue.
I love this idea with the berries. I have to find some olive buckets…thanks for the links!
Happy fall (or pre-fall)!
Jane x
Love the look. The grape vine wreaths are a great addition. Love the olive buckets. This looks great with the coloring of your door and home.
Love the orange mums with your blue front door, it looks fantastic. i like the way you dressed them up & as usual your photography is beautiful! Thank you so much for getting your blog back for me a couple of weeks ago, I am glad to be back and enjoying it!
Wow that looks fantastic Ann and I wouldn’t have noticed the grapevine wreath until you pointed it out….brilliant idea by the way. Love the orange mums against the blue door.
I so love olive baskets. It brings me back to the years of ’76-79. My in laws owned a country store in the middle of nowhere where an oil company also owned huge farming as well as huge family farms around. Crops were mostly cotton but the huge oil company had a lot of olives. The crews came from an hour away so they often stopped to get food for their drive home. Picking was done by hand then. Now I know they used buckets but I don’t know if they looked like this. But look at an olive. Think how quick and nimble their fingers flew amongst the branches as they teetered on ladders to fill just one of those baskets. They had to fill many. Their contractor was paid and then paid them by how many buckets they’d picked. It was hot. Now it’s all done by machine. I noticed the oranges, lemons and olives are replaced by pistachios. They used to be handpicked but now are oh so carefully picked by an engineered machinery to do just that. So I look at the olive buckets and think back on those crews that came from the area where most olives were grown. I finally got faux this year and I certainly am glad I read your post how to utilize them for mums!! Thank you!!! This same time period a local farmer was showing men from Israel our farming methods for the Southern San Joaquin Valley is quite similar to Israel’s soil and climate. Just wish we’d stayed up with them and had desalination plants in place for drought years.
Thank you Ann for mentioning where your doormat was purchased. Love it, and on my way to my Lowe’s in Wadsworth. Leaving in a month for Italy (Bucket List wish.)
Love your mums in those olive buckets,they really are colorful with the front door and door mat.
Simple things can make all the difference,lovely Ann.
Love the looks of the mums in the olive buckets!
I love the olive bucket/mum combo. Your entry is so pretty! I wasn’t going to put out mums this year, but I might seriously steal your idea. Love it, Ann!
Love your olive buckets filled with beautiful mums. The pots inside as risers is a great idea.
Hi Dorene! Did you check out the links I included to other olive buckets? Some are a bit pricey but others are not. Take a look!
I have seven built-in planter boxes on my front deck. I will definitely use the wreath and mum idea in them for a fresh new look to my deck. Thank you.
Such an easy yet great way to show off the fall colors… Love it! Thanks for the giveaway chance.
I love those olive buckets. The mums look gorgeous in them. How clever of you to add the grapevine wreaths to frame them. You have such good ideas.
Patricia
Hi Patricia! Hope all is well with you…thank you for saying hi. :)
Ann, the mums are perfect in the olive buckets!…I so love how you added the grapevine wreaths at the base of the mums. A very special and creative touch….Have a great weekend Ann!
Such a cute idea! Thanks for the how to. Yours look great,
Have a great day
I love those Olive buckets Ann! They are perfect by your door. Nice mums too. I have to go get some next week.